


This tutorial will focus on showing how planets can be modified in Starpoint Gemini Warlords. It will use existing planet (Data\Models\Planets\Baeldor\...) as an example.
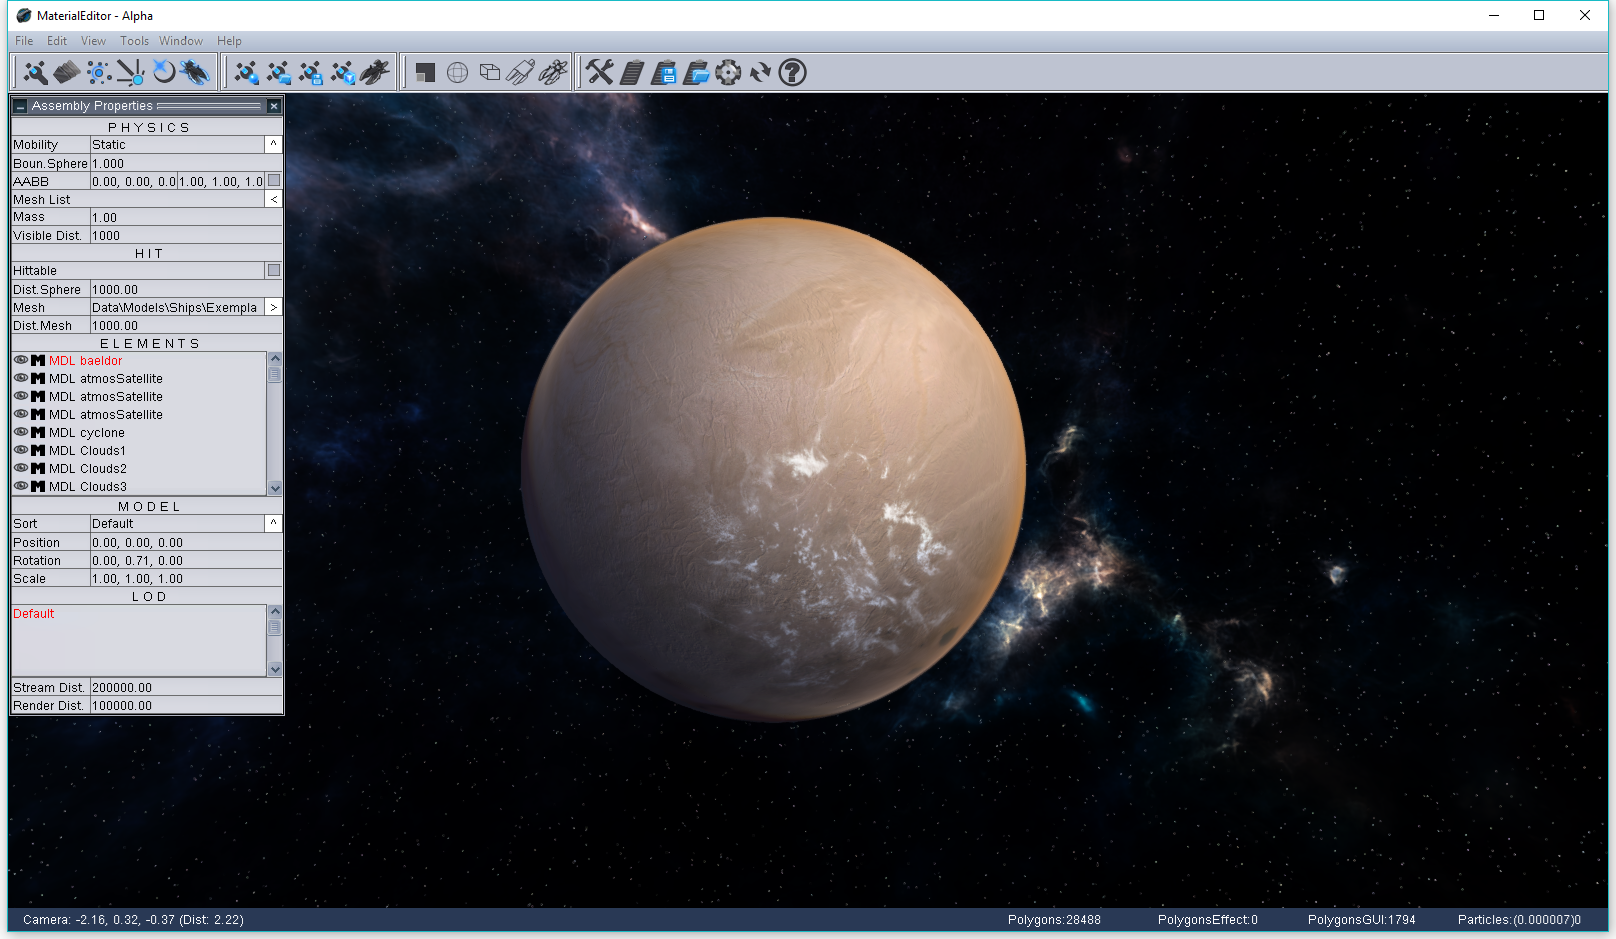
In Material Editor, load assembly: Data\Models\Planets\Baeldor\Planet_Baeldor.asb. This will open up the models associated with the assembly and show them in the Editor.
Start off with the planet
![]()
First we will edit the main planet model: baeldor.mdl. We select it in the ELEMENTS list (in Assembly Properties panel), and then click on the Model Editor button (shown in the image)
A new panel will show, named Model Properties. From this panel any change made on the properties it contains will affect only the selected model, in this case baeldor.mdl.
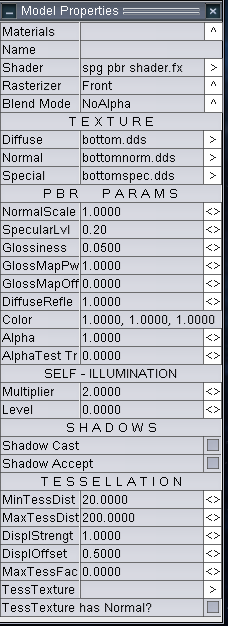
- Materials property selects individual material subset within the baeldor.mdl. Most *.mdl files have only one material, but for planets there are 6 materials (one for each "side" of the planet). Each subset has it's own parameters, so for the whole baeldor.mdl model to be modified each subset needs to be edited separately.
- Shader property changes the shader with which the model is rendered. Best to use spg_pbr_shader.fx here.
- Rasterizer changes the cull mode. It is best to select either Front or Back here, but in some occasions Both mode can be used. (Both is generally slower than Front or Back, because it draws a model two times).
- Blend Mode affects the way rendered pixels of an model are blended with the background image. For planet it is best to use NoAlpha or Alpha blend.
- Diffuse, Normal and Special are textures for the model. Diffuse is the color texture, Normal adds subtle shadowing on the model. Special texture has multiple usage. The red channel of Special texture is specular intensity, green channel is glossiness, blue channel is illumination and alpha channel has different usage depending on the shader used. It is important to point out that usage of each of these textures and parameters is dependent on the shader assigned, because the shader decides how to use those textures and parameters.
- NormalScale scales the normal
- SpecularLvl scales the specular from Special.Red channel
- Glossines, GlossMapPw, GlossMapOff each affect glossiness (the green channel in the Special texture). Glossiness scales the glossiness from Special texture, and GlossMapOff adds an offset to that glossiness. GlossMapPw is an exponent that is applied to the glossiness. GlossMapPw is best kept at 1.0000, and edit other two parameters instead.
- DiffuseRefl affects the colorization of the specular light by the Diffuse texture.
- Color colorizes the diffuse color
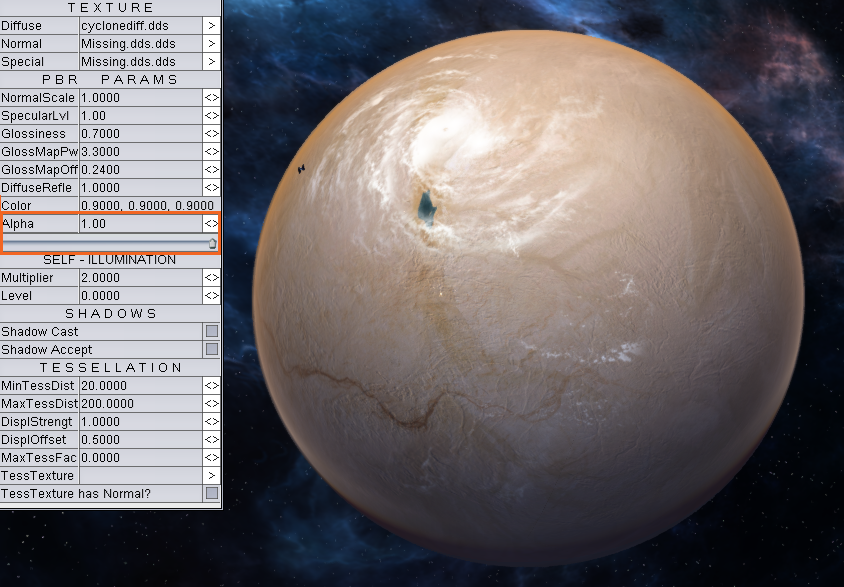
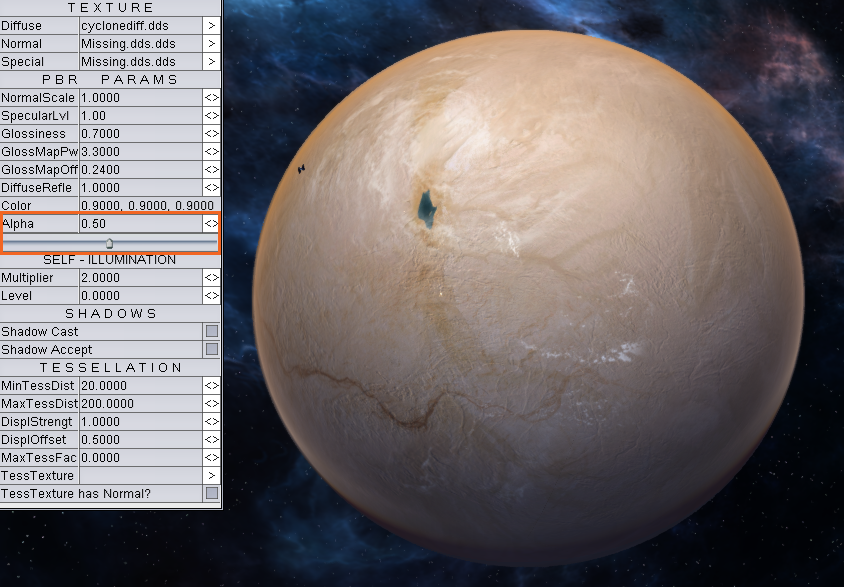
- Alpha affects transparency (together with the alpha channel from Diffuse texture)
- AlphaTestTr affects the transparency threshold (together with alpha from Diffuse) at which the model is rendered. It is the sharp transparency, with pixels only completely displayed or not displayed at all (there is no blending as is the case with Alpha parameter).
- Multiplier under SELF-ILLUMINATION affects illumination from Special.Blue channel.
- ShadowCast and ShadowAccept affect if the model casts shadow and receives shadow from other models.
These are the parameters that affect the appearance of the model. Other parameters are not important for now.
We will now go back to the Assembly Properties panel by clicking on the Assembly Editor button.
![]()
A planet, (that is the planet assembly file), has multiple models each with different parameters in the Model Editor panel. But we can categorize those models depending on their usage. For example, models that represent solid objects, like baeldor.mdl and atmosSatellite.mdl have similar parameters and they use the same shader. Models like cyclone.mdl, Clouds1.mdl Clouds2.mdl etc. represent clouds, and have similar parameters and use spg_planete_clouds.fx shader. CloudsWrapperAtmoSphere.mdl is the atmosphere surrounding a planet, and has a shader specifically designed for that effect. Ring.mdl represents a ring of asteroids around a planet, and has different parameters for that.
As mentioned before, baeldor.mdl has multiple material subsets, so for the whole model to change, each of those subsets needs to be modified.
Cloudy wheather

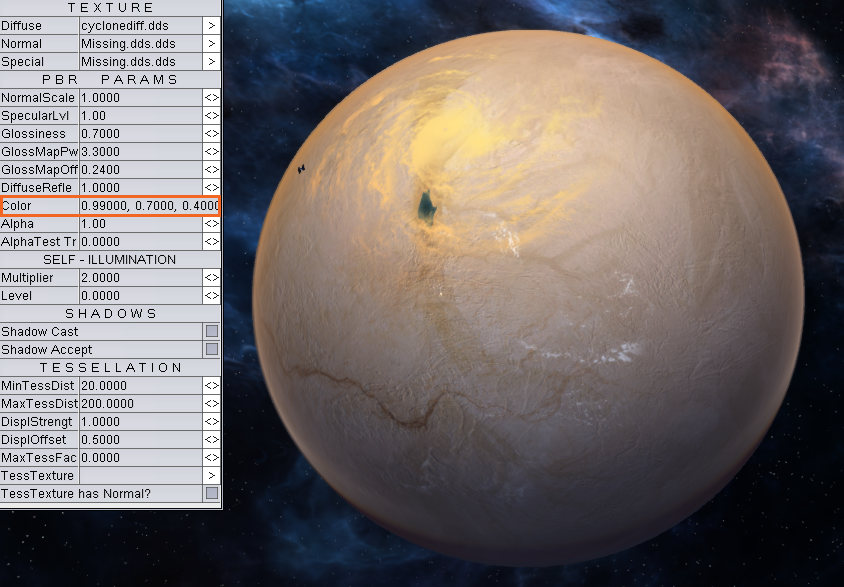
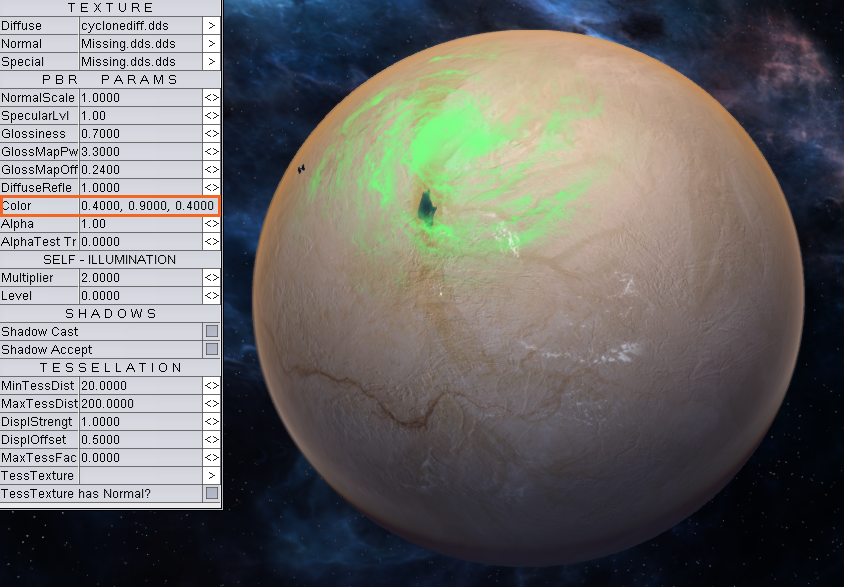
Now we will edit cloud models. We select one of them (for example cyclone.mdl), and then click on Model Editor button.
The parameters we can change for clouds are Diffuse texture, Color and Alpha parameters. Diffuse texture can be edited in image editor program with the capability to save to *.dds files. Diffuse texture for clouds has color in RGB channels, and transparency in the Alpha channel as shown in the image:
The texture needs to be saved in *.dds file, with the DXT5 ARGB 8bpp compression, with generated mip maps.
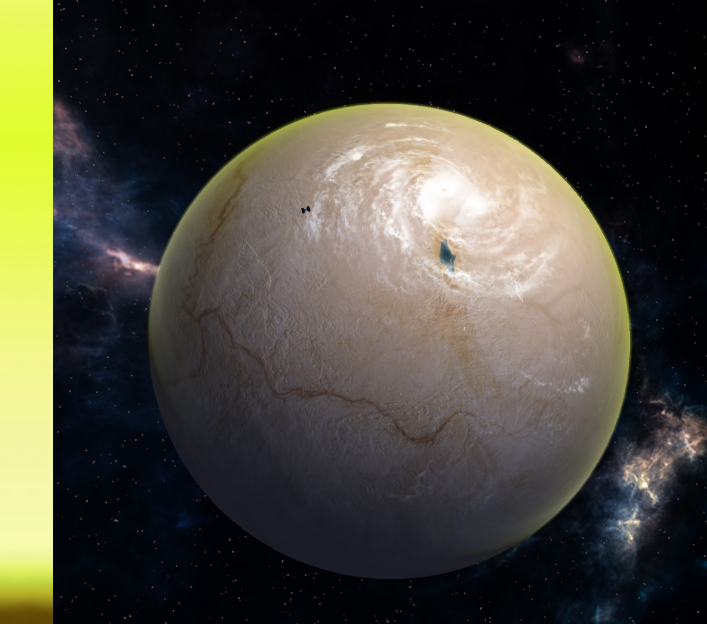
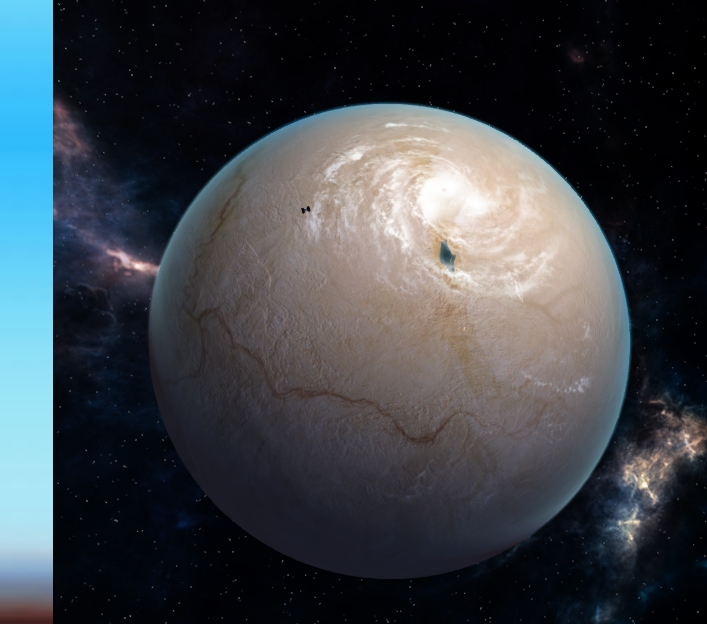
Color parameter affects colorization of Diffuse texture. The values of Color parameter represent Red, Green and Blue color channels. In the next images different values for Color are displayed.

Alpha affects transparency
Models for clouds need to be a bit larger than the baeldor.mdl. This can be accomplished by either creating a bit larger model, or by scaling it in Assembly Properties panel, under Scale. The value for the Scale parameter can be for example: 1.01, 1.01, 1.01, which means the cloud model will be 1% larger than the baeldor.mdl. If it is the same size as the baeldor.mdl it won't be seen, because it will be occluded by the baeldor.mdl model.
Atmosphere
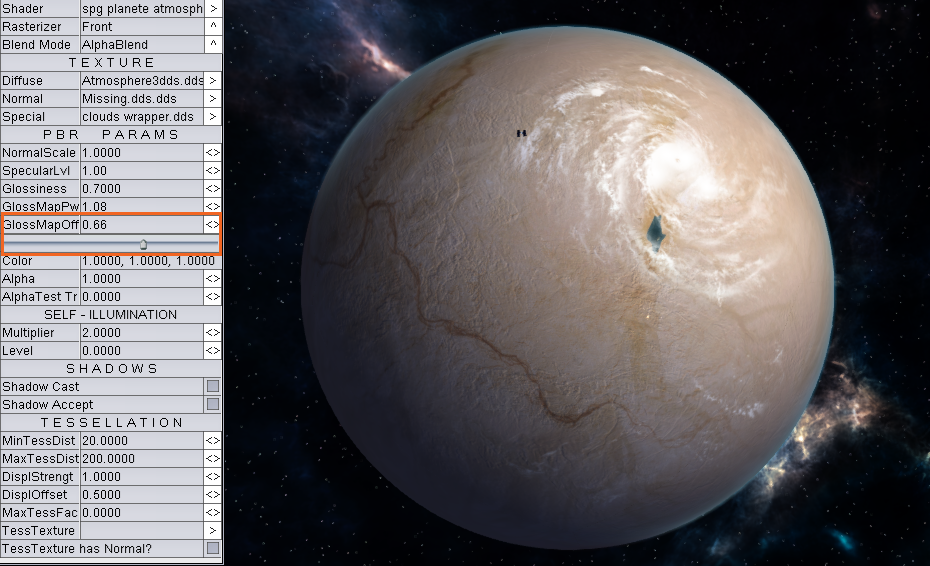
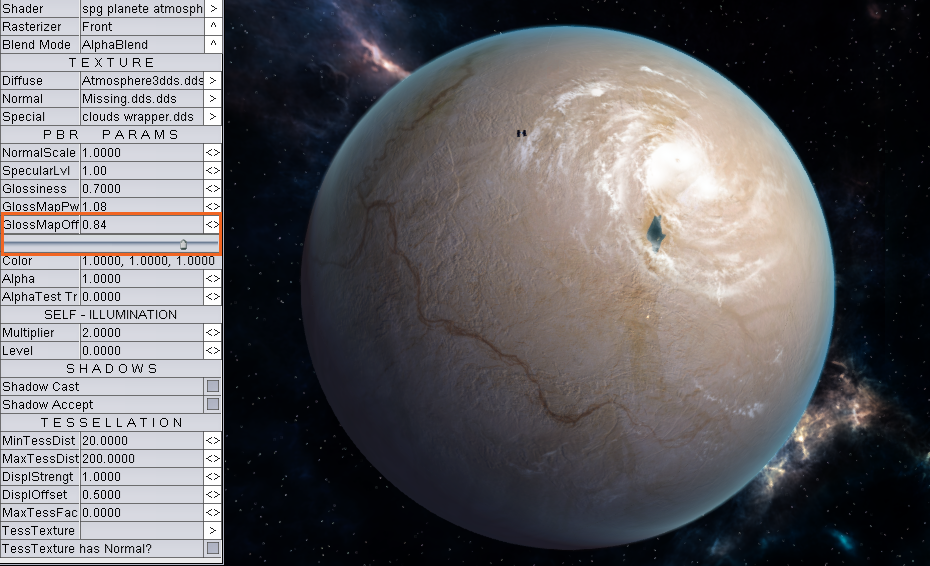
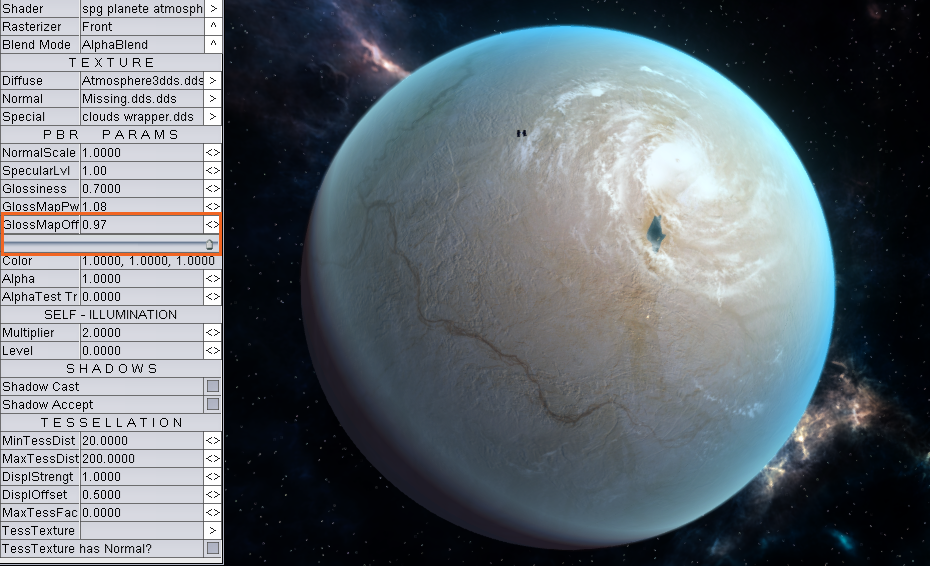
Next we will edit CloudsWrapperAtmosphere.mdl. We select it in Assembly Properties panel, and edit it in Model Properties. CloudsWrapperAtmosphere.mdl represents atmosphere of a planet, and parameters that can be edited for it are Diffuse texture, Color, Alpha and GlossMapOff parameters.
Atmosphere Diffuse texture is just a row with color gradient. It represents the change in color as the atmosphere is exposed to light, meaning that the more the atmosphere is lighted it will have the color in the top of the color gradient of the Diffuse texture, and if the atmosphere is in lower lighting it will have the color from the bottom of the gradient. The Diffuse texture can be changed by clicking on an arrow next to the texture name, and then selecting a new texture in the browser window.
For the Baeldor planet, this is the atmosphere gradient (rotated):
![]()
The left part is darker as it is used for dusk/dawn, and in the right part of the image is the color of the sky during day. The gradient image is rotated here, the gradient needs to be in upright position (so that the left part is the bottom of the image and the right is the top!). Next images show how the gradient affects the atmosphere:

GlossMapOff parameter, despite it's name, actually controls atmosphere's density. Default value is 0.84, but it can be any value between 0.0 and 1.0, where 0.0 means that there is no atmosphere at all for a planet, and 1.0 means that the atmosphere is very dense. The examples are shown on next images:

As is with cloud models, the atmosphere model needs to be scaled too, to prevent occlusion from planet model. The usual scale is 1.02, 1.02, 1.02, that is 2% larger than the planet. (The scale of 1.0175, 1.0175, 1.0175 is also good). It can be scaled in Assembly Properties panel, under Scale when the CloudsWrapperAtmosphere.mdl is selected.
Planetary ring
Next is a ring.mdl. Some planets have asteroid rings around them. Rings don't have much parameters that affect them, just Diffuse texture, Color and Alpha. Example of a ring texture:
![]()
The texture has an alpha channel, but since the blend mode for rings is AditiveBlend, it is not used. Dimensions are usually 16 x 512 pix, saved into a *.dds file with 8.8.8.8 ARGB 32 bpp | unsigned format, and with generated mip maps.
Color and Alpha parameters work the same way as with other models presented here.
Some final thoughts
This whole process can seem like an ordeal, but it really isn't. We've chosen Baeldor as the example so we go over all the parts a planet can have, but your planet doesn't have to have clouds or a planetary ring. It's up to you :).