At the end of the last news blog, I was just getting to grips with the player movement and some basic controls, and I'd decided to use a grid-based approach to collisions. With that working it was time to move on and start breathing some life into the enemies in the game, which meant that I was going to have to start working on one of may favourite parts of developing a game... the AI.
Finite State Machines
When I start to code the AI for a new game, I generally don't ever rely on previously made frameworks or scripts from other games. I've found that each game requires a unique solution and that if you want it to work correctly and do what you require, then the only way to go is to build it from scratch. That doesn't mean to say I don't look over the rather large number AI demos and scripts I have lying around as they provide a valuable resource for ideas and techniques as well as fast-prototyping, but I generally start from zero and just take snippets that are appropriate (you can find a load of my old GM7/8 AI stuff - as well as other tech demos - from here if you're interested, but beware! It's all quite old and probably a mess...)
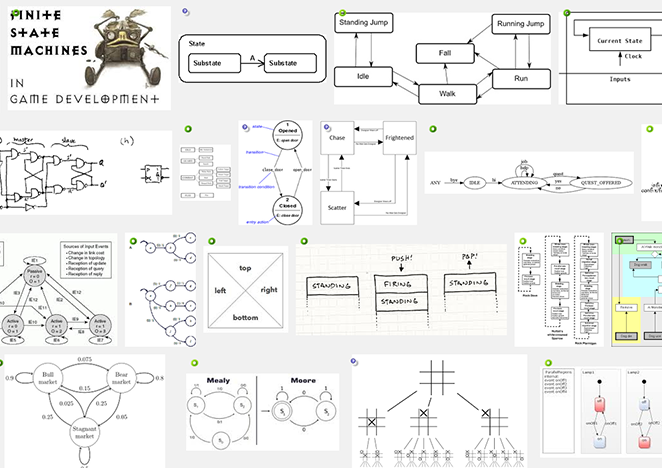
That said, I almost always rely on one particular system for coding AI: the finite-state machine (FSM). If you aren't familiar with the term, all it really means is that for any given situation, the AI will have a specific "state". So, for example, a top down shooter AI could have a "hunt" state, a "shoot" state and a "run away" state. using states like this means we can compartmentalise the code and take each state as a discreet unit, making editing and changing things far easier, and it also has the added bonus that at any time in the future you can add more states and expand the AI! Great, no?
How you plan your AI is up to you, but I find that using pen and pencil to sketch out flow charts is a great help when it comes to visualising behaviour, and I've seen a number of devs that do the same thing before sitting down to code. My own flow chart for the game looked something like this:
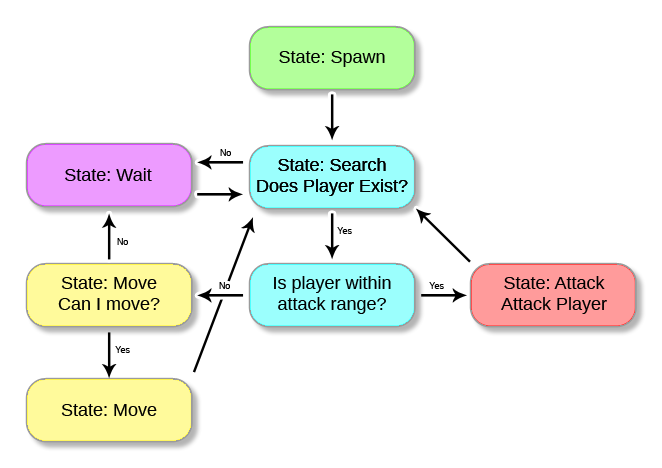
Since the game is more of a fast shooter than a full blown RPG, this simple AI should fit my needs nicely as I want hoards of enemies to attack the player, zombie-like - the challenge is going to be in the sheer numbers of enemies, not in their intelligence!
Coding The FSM
Opening up GameMaker again, I started by ripping out the old "cut and paste" code I had for the AI (see last weeks tech blog for why it didn't work anyway), and I created a number of new variables to control speed, damage, health and, of course, the "state" of the enemy. This object would be my enemy parent, and would never actually be spawned in the game, but instead used as a template for all the enemies. In this way, I can further customise the behaviours by simply overriding an event with something else if necessary and can also use the object_index variable in checks to have specific actions only affect specific enemies. Parenting is very powerful and has the added benefit of keeping the code base reduced and easy to manage, so where possible I would recommend using them.
I also took a moment to make a few constants for each of the possible states: state_spawn, state_wait, state_search, state_move, and state_attack. I can add more states at any time in the future should I need them, and they will help me keep the code as readable as possible. The next step was to start in on the searching and movement of the instance, then I'd add in attacking and waiting, etc... once that was done.
I'd made the player movement snapped to a grid so I had to do the same thing to the enemies, but before that I had to set the initial state. This meant me setting the "spawn" state in the create event, and then calling an alarm. Why an alarm? Well my thinking went like this... I don't want all my enemies to move at the same time, as that would make them more "robotic" and be less chaotic looking, so I set an alarm to 1 + random(room_speed) so that each enemy will exit the spawn state at a different time. This also had the added benefit of "spreading the load" over the CPU, since all the instances would be performing their actions and state changes at different times.
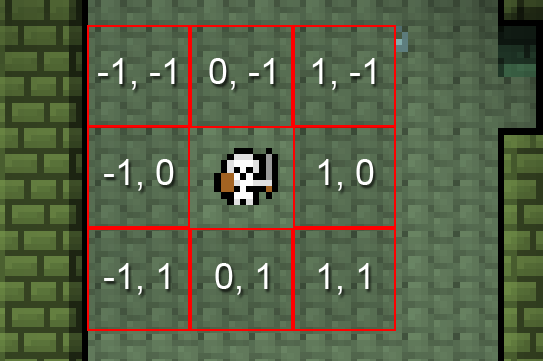
In the alarm I set the state to the "search" state and then I added in some very basic instance find functions to get the ID of the player instance and store it in a variable. If no instance was found, I just reset the alarm and looped around to check again, but if the player instance is found I then programmed a simple DS grid lookup to find out if the player is beside the enemy or not (remember, I am storing everything in the game in a global ds grid). This was easily achieved by checking the relative positions in the DS grid for the player constant, as shown in the image below. If the player was found then the enemy went immediately into the attack state, and if not it was set it to the move state. I'd need to add a further check in this section for ranged enemies later on, but for the moment this would be fine.
Last thing to add for the AI was the step event code. Here I added an initial check to see if the instance was snapped to the grid, since if the instance is not snapped, then it is moving and cannot do anything else. That was actually pretty good for performance as it meant that for a few steps the instance really isn't processing anything at all, and with the spawn alarm being staggered it also meant that there was a further spread in processing over time. After the snap check, I then wrote a "switch" to check the current state and act accordingly.
Moving
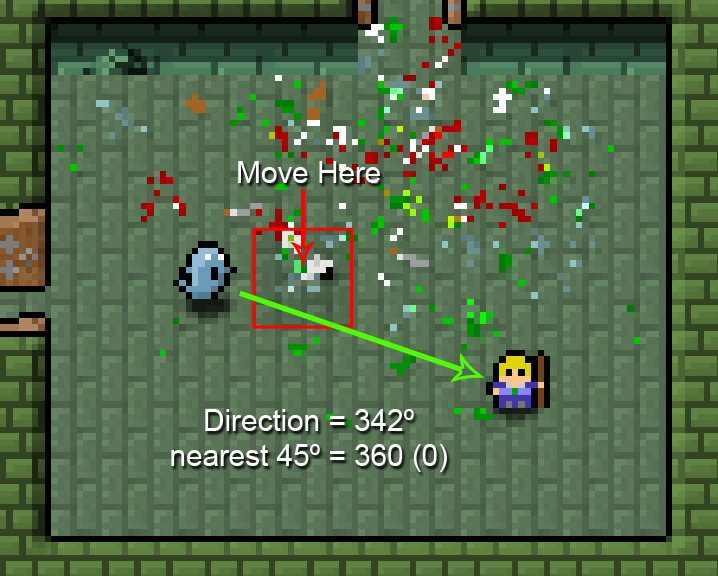
The actual movement of the enemy was again greatly simplified by using the DS grid. When the instance is snapped and the state is set to move, the instance gets a direction from it to the player, then rounds it to 45º angles before checking the grid position directly in front of it for any obstacle , which avoids any of the costly place_meeting or other collision functions.
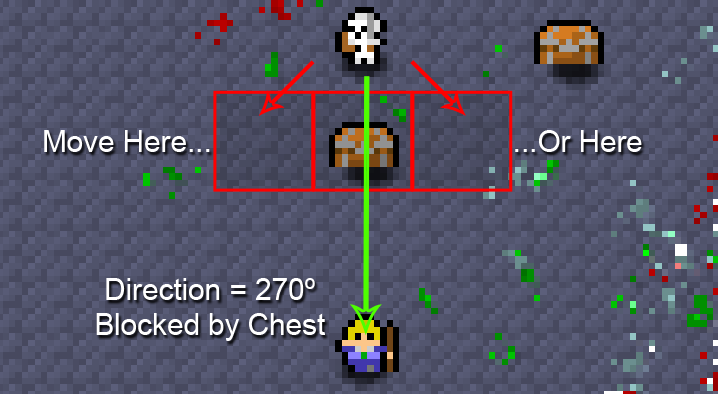
But what happens if the way between the enemy and the player is blocked? I really didn't want to add in any costly path-finding functions to the game, and I couldn't use anything like mp_potential_step either, due to the grid-based movement. but, like said at the beginning, I really don't want the general AI to be very clever, so a simple check to the left and right of the instance for further obstacles would probably do...
I quickly made an obstacle for the game - a chest, which I would later have the player react with to open and get gold from - and added a new switch case into the spawn script of the dungeon generator to add them into rooms randomly. I also made sure that they were getting added into the collision grid I was using and gave them a specific constant to be detected. After that I had to modify the movement script so that if anything was blocking its next move it would then look to the left and to the right.
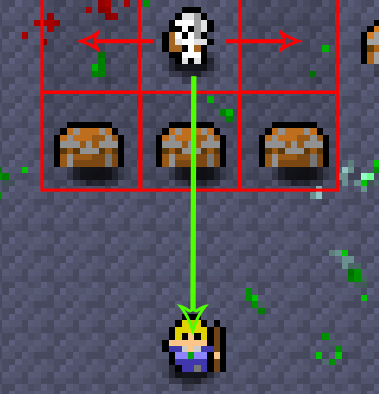
I had the code check both positions to see if they were empty and if they were it would choose one at random to move to. In some circumstances this would mean that the enemy will actually move away from the player, but that didn't bother me as I could see that being useful and that it would probably give a more "organic" feel to the enemy anyway. Note that I added a bit of further code to iterate through this process again to see if there were further moves to either side of the enemy too, and if I'd wanted I could have further iterated through the checks to see all around the player, but at this point I figured that would be overkill and may actually make the enemies a bit too intelligent.
Tweaks And Additions
Now I had a basic AI that I was quite happy with, it was time to add in a few extra things to the mix. I had already made a chest object, so I also made a potion object and a food object - to give the player health, since my enemies were now going to be attacking - as well as gold and a few particle effects to spice things up. I particularly enjoy making particles as you can get some really nice effects from some very basic code and a few sprites (there is a tech blog here on how to write your own particle system) and for the game I created a nice "coin fountain" effect for when you open a chest, and also a "floaty heart" effect for when you take a potion or eat food.
I then went on to tweak the AI so that the attacking state actually did something. This involved simply filling in the case for the state switch in the step event with a script to take damage from the player health and then set an alarm before checking and attacking again - nothing really fancy, but at this stage in development I wasn't too bothered about special attacks and things. I just wanted to get the basics down, and have a flexible code base to build on.
I Have A Game?
Did I have a game now? Not quite, but on testing what I had, I could see far clearer just what I had to do next and what the project could evolve into being. It was fun to wander around the dungeon and kill hoards of skeletons and ghosts!
Short Lived fun, though, as the lack of content meant that the fun aspect quickly faded... But with the basics now in place for the main game mechanisms, I felt the urge to move back into more creative ground, and so I started working on some special effects to enhance the visuals - specifically lighting - which will be the subject of the next news post.