Originally posted here: Making A New Weapon
Mirrored for archival purposes. I've also mirrored Gwynhala's model exporter in the files section. I have also linked to an archive.org link for the Milkshape weapon file and the sword1.scm. Unfortunately bmp was broken so you'll have to use the image he used in the tutorial.
Reprinted with permission of Secret Labs.
Getting Started
First get yourself a copy of Milkshape and Gwynhala's Rune SuperCoolModel Exporter for Milkshape 3D.
Download Milkshape
Download Gwynhala's Model Exporter
Download the Milkshape weapon file
Download sword1.scm
Download sword1.bmp
Install Milkshape, then unzip all the files from the exporter into your Milkshape folder.
If your not familiar with Milkshape go here for some tutorials on it.
Now we can begin making some weapons
The first thing we need to do is give the weapon some joints. Click on the Joints button.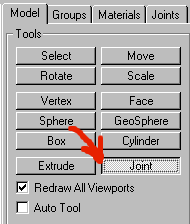
Now click on one of the 3d views and add a joint. 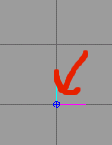
1. We have to give these joints a name. Do so by clicking on the joint Tab.
2. Name it "base"
3. Click rename
The base joint is where the player "grabs" the weapon.
This is the easiest way to do it. There are other ways but this is the basics. Once you get a few models imported, you will see how it works.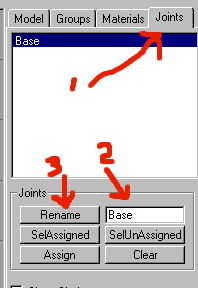
Now we can start bringing our weapon to life. I am not going to get into how to use Milkshape in detail. I have made a basic sword using two cylinders, and a box. You should try to keep the weapon simple to keep your frame rate down within the game.
You have to give the sword a second joint at the tip. This one is to be called "Offset" This way rune knows where the player grabs the handle.
We will add some texture to the sword now.
Make a texture in some kind of painting graphics program. This is my texture below, It doesn't have to look like the sword because we are going to "Map" the texture.
Rune works with only certain size texture files. the most common are 256x256 or 128x256 I try to make my weapon textures 128x256.they have to be 256 colors. And either .Bmp or .Pcx. I use .Bmp's And try not to use True Black.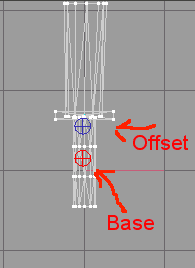
This is my texture.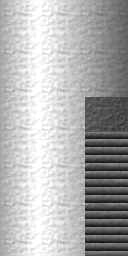
In Milkshape:
1. Click on the materials tab,
2. Then new
3. Enter in the name "sword1" then click rename
4. The material now has appeared in the display box.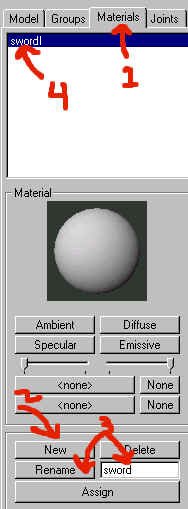
1. Click on where it says none and select the texture image you created.
2. It will display on the ball.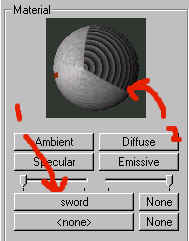
Milkshape has what's called a "Texture Coordinate Editor." This is used for "mapping" textures. You can get to it by hitting CTRL - T or clicking Window then Texture Coordinate Editor. Select your entire sword by clicking on.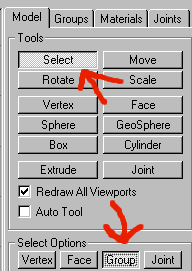
Select your entire sword so it turns red.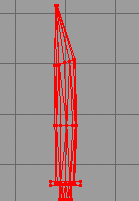
Click on the Materials tab again, and click assign.
Now right click the Preview window and select Textured.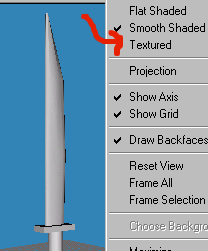
Your sword may look silly like this. This is where the texture coordinate editor comes into play. Hit CTRL T with the sword still selected, A new window will open. 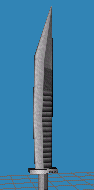
You will see where it says Cylinder01 in the dropdown menu. That's the for my sword handle. I will click on scale to make it fit in the area where I want my handle to be. and do the same for the other groups.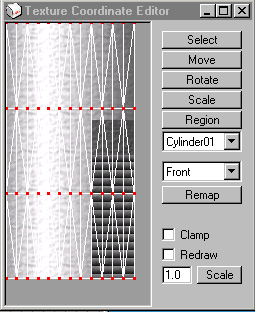
This is what it looks like "mapped."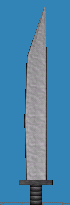
Now we have to finish up the sword by "Regrouping" the entire sword. With all the groups selected still select the groups tag.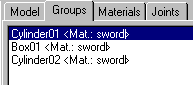
Then click regroup. Now you have made your first model. Time to export it!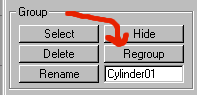
Time to export
Save the file to a directory you will remember name it "sword1."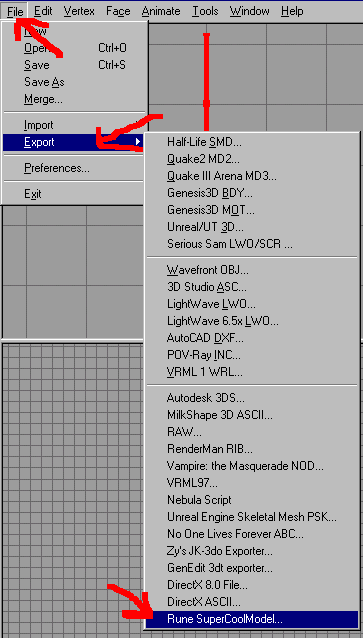
IMPORTANT
Once you save the file you will be asked for a TWEAK JOINT FILE and a SEQUENCE TWEAK FILE. Just click CANCEL for both. These are not needed!!
That's it now were ready to import the sword into Rune.
Importing into Rune
Open RuneEd. Select skeletal from the dropdown menu on the right.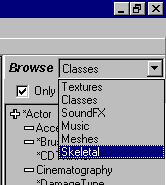
Click Import.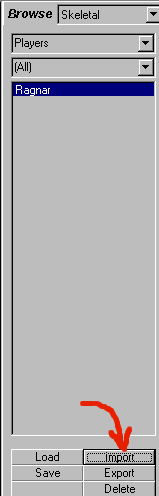
Select the sword.scm file you just exported.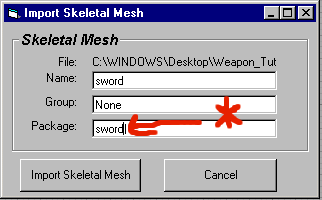
IMPORTANT: make sure you rename the Package. If you overwrite one of the default Rune packages it WILL mess up your game. Rename the package sword1, then click Import Skeletal mesh.
Select sword1 from the skeletal dropdown menu.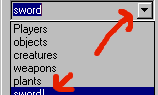
Save the skeleton then LOAD it. If you don't load it after you save it RuneEd WILL crash.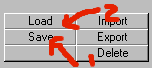
Select Classes from the top right dropdown menu.![]()
Expand Classes-Inventory-weapons- sword. Select Dwarfworksword then click NEW down at the bottom.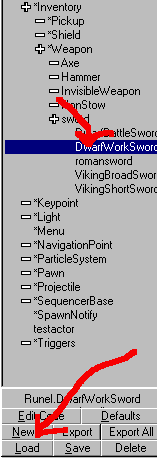
ONCE AGAIN MAKE SURE YOU NAME THE PACKAGE sword1. Click create this actor class.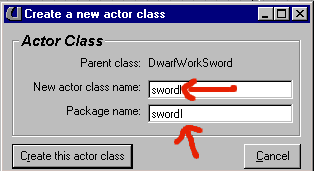
A blue window now pops up. That is the script. What I do is double click the weapon I am copying. So Double click DwarfWorkSword it opens up its code. Copy the script from where it says to the end.
//================================================
//
// Powerup: LightningSword
//
// This function is called when the weapon is initially powered up
//================================================
Now paste it into the blue window of your weapon.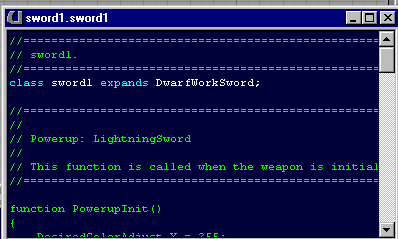
Now HIT F7 this will compile the changed script.
Click on your sword class "sword1" and click "Defaults" this opens a new window, We will now ad out sword skeleton in as a "Substitute Mesh."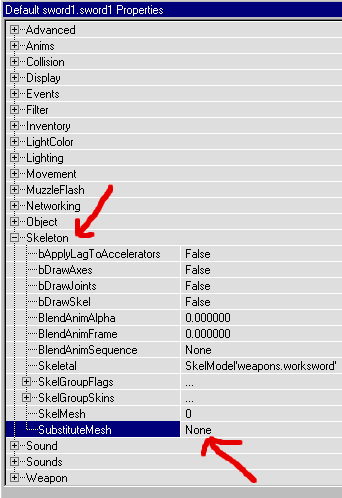
Leave this window open. Click on the drop down menu once again and select "skeleton" select your sword, sword1 select it, then click on substitute mesh and then click USE.
Now go back to classes in the right menu, make sure its on sword1 and click "save" at the bottom. Now we have to change the textures, The sword still has the dwarfbattlesword textures on it.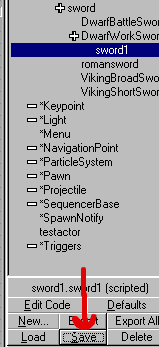
Now the only thing left to finish off the model is the texture. Use the dropdown menu on the right and select Texture. Use the menu below it and select sword1. Import your texture there. It must be named EXACTLY like the blur on is. The blur texture is the default texture that is imported when you import the .Scm, It doesn't have the ability to import images yet.
Once you import the texture, the blue one will now turn into your texture.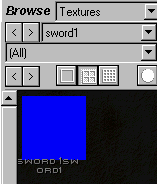
Now use the dropdown menu and select Skeleton then select your sword, now save it again. let it overwrite the old one. This will insure you that the texture you imported is now saved. Click on the textures dropdown menu, and replace the default ones with your new textures.
Save your sword again.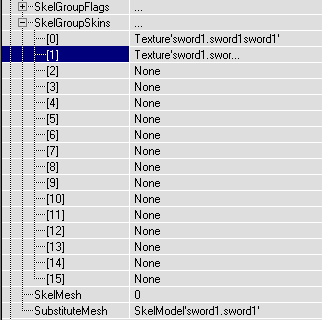
Since you are importing a new mesh, you have to change the "Stow Mesh" Of the default weapon. Rune uses 2 meshes for the weapons. Large weapons like the DwarfBattleaxe would look silly if it was on you back that big, so they use a second one that is a little smaller. We're not going to do that. As you can see, The stow mesh must be set to 0 because the skelmesh is 0. You can change this under weapons.
Just one last step.
You can either open a map and add your sword into it to test it. (don't save the map though) or you can summon it within the game. If you want the weapon to be used on your server you MUST.
Open your Rune.ini file in your system directory scroll down to where it says:
ServerPackages=add
ServerPackages=sword1
When you're in the game, log in as admin and type
summon sword1.sword1
And there is your shiny new sword!


