Tutorials written by Mr Baggins
Mirrored here for archival purposes
Tips 'n' Tricks
These are some tips and tricks for building custom maps with Lawmaker. They might not be interesting for experienced Lawmakers, for they deal just with general topics. I've put them up for all new Lawmakers 'cause I found no adequate newbie-tutorial. So I wrote (and still write) down things I found (and still find) out while editing levels myself or while reading the posts at the Code Alliance.
Doors
How to insert a door
Basically, a door is a subsector of a room, so inserting a door is no major problem. Let's take an example, we want to insert a door into this sector: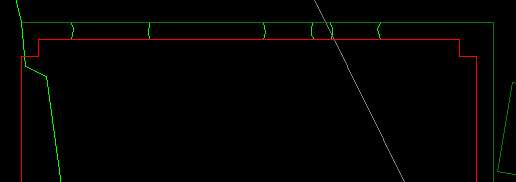
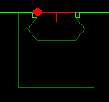
First step: We add a subsector to the selected sector by pressing CTRL+K. Then we resize this subsector until it's about as large as a door should be. The sector could now look like this:
Now we select the subsector and set its ground height to the height we want our door to have. It must not be higher than the room the door is in, else you get some funky results! Now, finally, we texture the outer walls of the door. If you have a look at it now in the game, it should look like a door should look. But it won't open yet!
Adding functionality
There are two kinds of doors in Outlaws, one are sectors marked with a special "door" flag. In order to make our door open, we open up the "Flags" dialog and select the flag "Door"
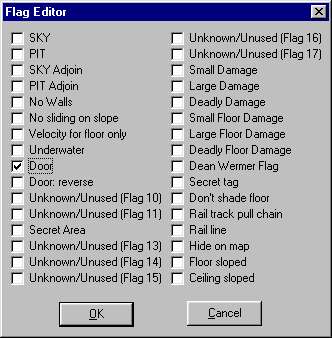
If the door doesn't open correctly, select also "Door: reverse". The door should open now.
The other kind of doors requires some INF-scripting. Let's give a sector a name at first, let's say "DOOR", for example. Outlaws isn't case-sensitive, so "DOOR" or "DooR" or something else would make no difference. For INF-doors, it is very important to remove the door flags from the sector again.
First, we select the eight walls of the door and set the flag "Morph with sector" (64). If you do not set this flag, the door won't open later on. Now we open the level's INF file add make an entry like this (without the line numbers):
01: ITEM: SECTOR NAME: DOOR
02: SEQ

03: CLASS: ELEVATOR MORPH_SPIN2
04: CENTER: xx.xx zz.zz
05: EVENT_MASK: 48
06: SOUND: 1 DOOR3.WAV
07: SPEED: 50
08: STOP: 0 HOLD
09: STOP: 80 HOLD

10: SEQENDNow, what does that mean exactly?
01: I am a new sequence, I work on a sector called "DOOR"
02: I'm starting here
03: After some sort of push I do some spinning work on the sector
04: This is a point (a vertex) around which the sector should turn
05: I will start on this event
06: This is the sound that will be played while I'm working
07: You should know what that means
08: Before I start, the sector is positioned in this angle...
09: ... and when I'm finished, in this
10: Now, that's it!The most tricky thing in this sequence is the spinning point. For my example, I took the exact middle of the right wall of the sector, I just added one vertex' z-coordinate to the other's and divided the result by 2. The x-coordinate of the two points are identical. Let's have a look at it in the game right now: Surprise, surprise, the door opens...
"You need the Iron Key!"
By now, there's one big mistake on our door: It opens all the time. Sometimes doors are locked, so you have to find a key to open it... Locking our door means some changes in the INF sequence. Doors using the door flag can't be locked, they always open. So here we go:
01: ITEM: SECTOR NAME: DOOR
02: SEQ

03: CLASS: ELEVATOR MORPH_SPIN2
04: CENTER: xx.xx zz.zz
05: EVENT_MASK: 48
06: OBJECT: 100 196608 AUTO
07: SOUND: 1 DOOR3.WAV
08: SPEED: 50
09: STOP: 0 HOLD
10: STOP: 80 HOLD

11: CLASS: TRIGGER STANDARD
12: CLIENT: SYSTEM
13: MESSAGE: USER_MSG 802
14: EVENT_MASK: 48
15: OBJECT_EXCLUDE: 100 AUTO

16: SEQENDLet me explain the new lines a little:
06: I'll start working when the player uses this object on me
11: Besides that spinning stuff, I'm doing some further work
12: I'm doing some work in the engine
13: I'll throw out this message...
12: ... if the player both performs this...
13: ... and has not got this object in his inventory.Both the object and the screen messages have certain numbers. They can be seen in the local.msg, which hides out in outlaws.lab. When using the script editor that comes along with Lawmaker, a dialog where you can choose the stuff you need pops up when double-clicking the properties USER_MSG or OBJECT / OBJECT_EXCLUDE. Well done, that script editor! There's also a template plugin for Lawmaker, which adds some entries to the menu. When choosing such a template you just have to adjust speed and coordinates.
By the way, when using locked doors, be sure to place the key to open it somewhere in your level!
"It's locked from the inside!"
There's another kind of doors: They don't open from the outside but only from the inside! Unfortunately, this can't be done by just changing that EVENT_MASK (dunno why there's an event "nudge from inside"). This is the first part of the new modified INF:
01: ITEM: SECTOR NAME: DOOR
02: SEQ

03: CLASS: ELEVATOR MORPH_SPIN1
04: CENTER: 44.1250 301.7500
05: SOUND: 1 UNLOCK.WAV
06: SOUND: 2 DOOR1.WAV
07: SPEED: 30
08: STOP: 0 HOLD
09: STOP: 80 TERMINATE
10: EVENT_MASK: 0
11: CLASS: TRIGGER STANDARD
12: CLIENT: SYSTEM
13: MESSAGE: USER_MSG 807
14: EVENT_MASK: 32

15: SEQEND
Now that doesn't look very different, does it? There's just another spinning CLASS, at the second stop there's TERMINATE instead of HOLD, then there's another EVENT_MASK... dammit, why do I have to use EVENT_MASK 0? But when I play it now, I get that USER_MSG everytime, it makes no difference if I nudge the door from the inside! Well, there's a second part to do in the INF!
01: ITEM: LINE NAME: DOOR NUM: XXXXXXXX
02: SEQ
03: CLASS: TRIGGER SWITCH1
04: SOUND: 1 0
05: EVENT_MASK: 48
06: CLIENT: DOOR
07: MESSAGE: NEXT_STOP
08: SEQENDNow I'll explain it: By using just the first part, the door will never open when you nudge it. Think of EVENT_MASK 0! We use another CLASS, called ELEVATOR_MORPH_SPIN1. SPIN2 means doing some spinning work after a push, SPIN1 means spinning work after other events, or after certain INF messages (don't mix up INF messages with user messages!). But let me explain the second sequence now, you will see what happens exactly in the engine:
01: I work on a wall (LINE) that is part of a sector NAMEd "DOOR" and is NUMbered X
03: I am a switch
05: On this event...
06: ... I send an INF message to the sequence of "DOOR"...
07: ... an INF message called NEXT_STOPThe inner wall works as a switch! When pushing the switch the INF sends NEXT_STOP to the first sequence. The door is opened and the first sequence is TERMINATEd. So if you push that switch again it sends its INF message but the door has got nothing to do anymore and therefore stays where it is. The number NUM that is necessary for the second sequence can be found in the caption of Lawmakers property window when you select the wall. Be sure to select the right one (it's an adjoined sector so there are two walls per side).
Ladders
Imagine a modern 3D shooter without ladders! Unfortunately, the Dark Forces engine (which is used by Outlaws) does not support ladders or something similar, but there is a little work-around to get a similar effect. As far as I know, it was invented by Graham in his map "The Charlie & Larry Express". This is what it looks like in the game:
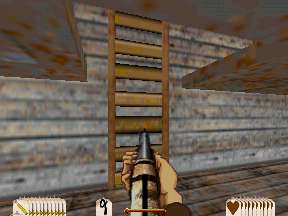
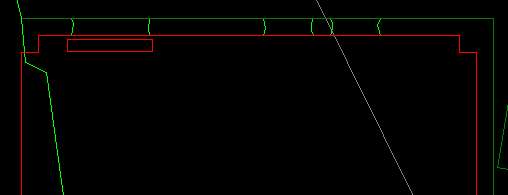
And this is how it looks like in Lawmaker:
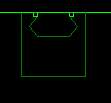
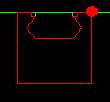
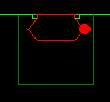
Picture 1 shows the whole area we're talking about. The square sector is needed for the adjoin with the upper floor of the wagon. But what about that little subsector? If we have a closer look at it, we will realize that it's no subsector at all but a seperate sector (Pictures 2 & 3). When selecting the wall shown in Picture 4, we can see that it has an overlayed texture which looks like a ladder.
But why can you climb the ladder? Ol' Graham set the gravity of this little sector to 15! A normal gravity would be -60, but 15 lets you fly where no man has gone before! Thus you think you climb a ladder...
Custom Weapons
This tip doesn't really contain information on how to make custom weapons, but I try to explain how a weapon works in general. When I talk of weapons I'm thinking of shotguns, fists and rifles but not of the knife and the dynamite (they work a little different). But here we go:
Some weapons on my resources page are intended to replace other weapons, for example the cannon by TheOutlawDad. To make them work, you just have to give 'em the name of the weapon to be replaced, for example "igatgun.nwx". Now the cannon will appear whenever you select weapon number nine.
To build your own weapon you need at least two ITM and two NWX files, if you want to create your own ammo, two NWXs and ITMs more. To those who don't know: NWX and ITM belong together, the NWX contains the graphics, the choreography (and some more things I don't know), the ITM file contains sound used, behaviour and size of an object.
The following - let's call it analysis - focuses on a map called "Longbow", a custom weapon with custom ammo. You can find it in "Broken Treaty" (brtreaty.zip) at Pale's.
The first pair of ITM/NWX is needed for the ground object, that's the one lying around in the game. The NWX usually consists of one single picture. The ITM is much more interesting, here's an excerpt:
01: INT PICKUP_COUNT 2
02: STR PICKUP1 IARROWS
03: INT COUNT1 5
04: STR PICKUP Ilbow
05: INT COUNT 1

01: You're picking up two objects.
02: One is called IARROWS...
03: ... and you pick up five of it.
(you're starting out with five arrows)
04: One is called Ilbow...
05: ... and you get just one.You can see that ammo and the weapon itself are treated separately. IARROWS is the ammoNow, the second pair of ITM/NWX is used for the weapon you see in the inventory. This is also the weapon that you hold in your hand. The NWX contains graphics for the movement for pulling the trigger (I know that a bow has no trigger!) and for reloading. The ITM looks approximately like this:
01: FUNC Weapon_RifleHandler
02: INT SLOT 6
03: STR AMMO IARROWS
01: This tells the engine how to handle this weapon.
02: The weapon is available in weapon slot 6 (Sawed-Off)
03: It uses IARROWS as its ammo.Again, Lawmaker's script-editor is very useful when editing these ITMs for it pops up windows where you can choose ammo, the handle and so on.
So, if you want to use custom weapons in your maps, you have to place the ground object somewhere, not the inventory object. Some of the weapons over there also contain regenerating items, they are intended for multiplayer maps. When using custom weapons, you should neither include the weapon that is replaced by your new weapons, nor use OLPOSTAL, for it loads the original weapons - and this might cause some grave problems!
The Binary Format
The level (lvt) and object (obt) files Lawmaker creates, are in ASCII format. You can have a look at them in simple text editors (such as notepad).
The levels from Outlaws v2.0 (olpatch2.lab) were distributed in a special binary format. OZ_Raptor wrote a little tool to convert 'em back to ASCII.
Now, some mappers publish their maps also in that binary format, I always wondered how they converted them.
To convert a text file type:
c:\outlaws\olwin.exe /tokenize map.lvt
c:\outlaws\olwin.exe /tokenize map.obt
The argument "/tokenize" causes Outlaws to create map.obb and map.lvb, the binary versions of your text file. The binary files are much smaller and thus load faster.
Be careful if your map is in another directory than the Outlaws directory. You have to type the directory name in the old DOS format, eight characters (e.g. "C:\LUCASA~1\TESTMAP\map.lvt")
Single Player Level Titles
The name of a level is determined in the header of its RCS/RCA file:
RCP 1.0
NAME: Outlaws Story
FLAGS: 0
For a Historical Mission, you have to create only an RCA file with the title in its header as shown above; Outlaws will show the title.
For a Single Player Mission (appearing at "Main Game"), you need at first an RCS file. The mission is now already selectable and playable from Outlaws' main menu; but the title that is shown now is just the name of the LAB file. To make appear the title that you want, you have to create an additional RCA file with the name in it (just copy the RCS to an RCA file). Unfortunately, the level now appears in both menus.
So, it doesn't seem to be possible to show the correct title of a level in "Main Game" without showing the level at "Historical Missions" as well, for Outlaws takes the level name from the RCA.
Publishing Single Player Levels
Single player campaigns usually consist of several levels. I have been asked how they can be linked and published together. This is the usual way of publishing single player levels...
A usual release consists of three parts:
The LAB file
I assume that you have stored every level in a separate directory. First of all, copy all the contents of that directories into one new directory (let's call it the release folder). Create a LAB archive with ConMan (or laber, as you like it) and add all the files from the release folder to the LAB.
Note that if you use text files to tell the story of your campaign, they shouldn't be included into the LAB. Outlaws seems to need the text files directly in its folder...
Now you already have the first part of your release!
The Story Script
Now you need a story script. It tells Outlaws, how your campaign is called and which story texts and levels are part of your campaign.
A simple story script for a single player mission with one level and intro and outro texts could look like this:
RCP 1.0
NAME: Campaign Name
FLAGS: 0
STORY:
BEGIN
TEXT: intro.txt
LEVEL: levelname
TEXT: outro.txt
END
PATHS: 0
Note that "NAME: " determines the name how it appears in the game; "LEVEL: " is the name of the level file in your LAB archive. The story script needs exactly the same name as the LAB, so if your LAB is called "test.lab", the story script needs to be called "test.rcs" or "test.rca" (depending on if you want to make a single player or a historical mission).
For a series of single player levels, use a script like this:
RCP 1.0
NAME: Campaign Name
FLAGS: 0
STORY:
BEGIN
TEXT: text1.txt
LEVEL: levelname1
TEXT: text2.txt
LEVEL: levelname2
TEXT: text3.txt
.
.
.
LEVEL: levelnameN
TEXT: textN.txt
END
PATHS: 0
The Readme
Mappers usually add a text file to their distribution with some miscellaneous information, such as specifics of the level(s) (textures, objects and stuff), author infos, and credits.
You can get a template for such a readme right here.
By now, you can put the LAB archive, the story text files, the story script and the readme into a ZIP archive and send it in.
The Unusual Way...
There's another possibilty to distribute a map; it's the best choice if you have a custom LOCAL.MSG (that's the file with all the screen messages) or a custom scrolling background for the story texts (like I did in "Aunt Rosie").
Therefore you put all your files (level files, textures, story text files and the story script) into your LAB archive. Rename the LAB to something like OLPATCH#.LAB, for example OLPATCH8.LAB. Outlaws will then think that your file is an official patch by LucasArts and load all its contents automatically.
The problem is that the number of patches seems to be limited. OLPATCH1 and OLPATCH2 are already used, a higher number than OLPATCH9 doesn't work. A simple but effective solution are batch files (as used originally in Fort Blood and copied by moi in "Aunt Rosie"):
ren aunt.lab olpatch8.lab
olwin.exe
pause
ren olpatch8.lab aunt.lab
The "pause" statement is needed, for Mr Windows launches "olwin.exe" somewhere in the background and continues with the batch file; it restores the original name long before Outlaws can see it.
A solution for this problem would be a seperate executable which calls the Outlaws application:
#define LAB_NAME_SRC "test.lab"
#define LAB_NAME_DEST "olpatch8.lab"
int main (int argc, char* argv[]) {
if (rename(LAB_NAME_SRC, LAB_NAME_DEST) == 0) {
system("olwin.exe");
rename(LAB_NAME_DEST, LAB_NAME_SRC);
}
return 0;
}
I wrote this originally for "Aunt Rosie", but would you execute a downloaded EXE file written by someone you don't know ???