I’m sure most, if not all of you, are familiar with what a ragdoll is, but for the ones who have just stumbled upon here, I’ll explain. A ragdoll is simply when physics takes over a character and their body falls onto the floor or against a wall. It would be quite annoying animating all kinds of characters getting thrown around, so ragdolls exist.
Now that that’s out of the way, making them in Unity is fairly simple and straightforward as long as you have the necessary set-up for it. The first and most important of these items is the Skinned Mesh Renderer, which is a fancy way of saying character model. This model should have hips, spine, upper legs, lower legs, feet, upper arms, lower arms, and a head. You will be plugging all of these body parts into a list in a moment. If you do not have one, Unity provides plenty of character models on their asset store for free.
With your character placed in the scene, you need to go to GameObject > Create Other > Ragdoll… in the top drop-down menus.
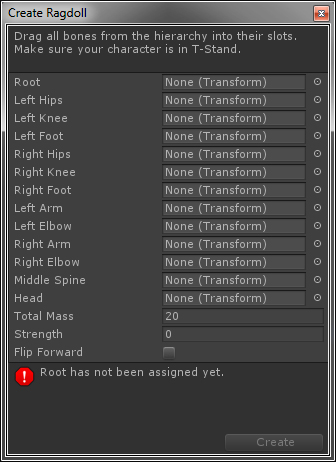 A little window will pop up asking for the objects I just listed out to be plugged in. I think it is important to clarify some of the things it’s asking for though.
-The “Root” it asks for first will be the hips of your character, not the actual root of the bones on the floor like some models have.
-”LeftRight Hips” which refers to the upper leg.
-”Left/Right Knee” refers to the lower leg.
-”Left/Right Arm” is the upper arm.
-”Left/Right Elbow” is the lower arm.
The rest should be self explanatory. Total mass of the character should be something heavier, I used 80.
After this process your character should pop out with a lot of green cylinders and boxes over him, and little green and orange arrows pointing out. I’ll explain these a bit later.
For now, let us bask in what is default settings on a ragdoll! Try it out by making sure to have some kind of floor collider under your character and hitting play. They should flop or fall down on the ground like a ninny. Go ahead and have fun with this, make more collision meshes, throw them down stairs, etc. If you notice any issues with how they are working, don’t worry, as we’re going to go through refining the options on them to get them working.
The green wire frames are the collision meshes. This is what will stop the character from falling through a wall or it’s own torso. Now what you do is select the objects that we inputted before and, one by one, refine them. If your character was like mine, the collision meshes were larger than the body parts they were attached to. This should not be the case. We want the collision to be as close to the actual size of the body as we can make it, otherwise when they fall, you will be able to see them floating above the floor.
To edit them, on each of the pieces you used for the ragdoll (Hips, legs, arms, etc) there should be two new scripts. A box/Capsule Collider, and a RigidBody (If you see something called Character Joint, that’s fine too). The second one we will go over later. Use the Center and Size parameters on the Box/Capsule Collider to adjust it’s position and scale accordingly.
Next we want to help define these orange and green arrows around the model (You can see them better if you’re zoomed out a little). On the objects with a Capsule Collider, there will be an extra script, called Character Joint. This is what controls how limbs can swing and where they face.
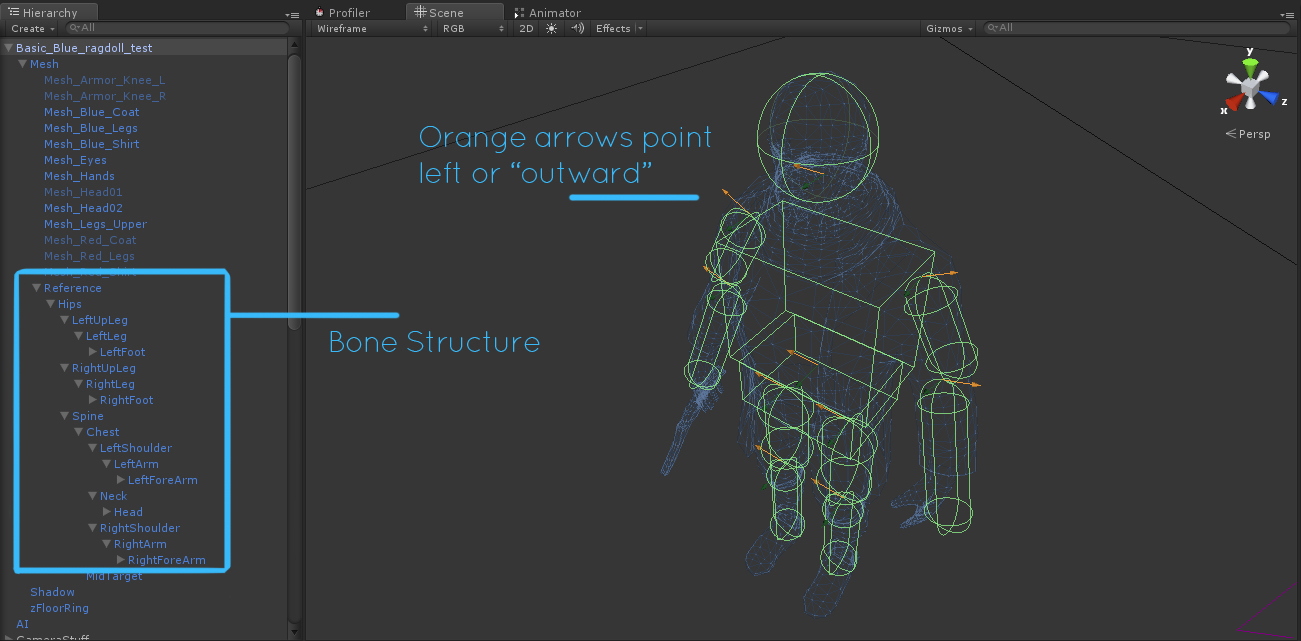
Using the two fields “Axis” and “Swing Axis” you are going to make sure that all of the orange arrows are pointing out or to the left, where as all of the green arrows will be facing the same way your character is looking. A reference screenshot is provided above so you can see what proper directions to make them face. You use 0 and 1 in the boxes to change their direction, it just takes a little fiddling to get it right, each character can be different.
Try using 1 0 0, 0 1 0, or 0 0 1 as these are the angles it wants to work in.
Almost finished! With the arrows pointing in the correct direction you want to look at the lower portion of the Character Joint script. There should be four sections called “Low Twist Limit,” “High Twist Limit,” “Swing 1Limit,” and “Swing 2Limit.” the important number is the Limit number in each section. This basically controls how far a bone can turn before it stops, similar to how you can’t bend your elbow backwards since your joint restricts that movement.
The easiest way to set these is to set the game into play mode and with your character on the floor, clicking on the word limit and dragging left or right will increase and decrease the number. Using this you can see the character’s limb become more and less restrained. Simply find a good number, end play, and set the number. Be sure to not set them all in play mode in one run, as play mode erases all changes once you stop.
The final note I wanted to add to this tutorial is how to turn this on and off. If you’re like me, you want the character to be running around, and after being hit or killed ragdoll, not just do it from the start. In each of the ragdoll bones you should notice a rigid body script. There is a checkbox inside called Is Kinematic. If unchecked, physics will be applied, if checked, no physics will be applied. So swapping between these on all of the effected bones should flip on and off the “ragdoll.”
And that’s it! I hope this tutorial has been helpful for those out there looking to do one. I know I had to search between a few sources to learn on my own, so I thought I’d compile my own tutorial with what I thought were the most important aspects. Have fun with your new ragdolls!


This comment is currently awaiting admin approval, join now to view.