NOTE: Information extracted from: Minecraftwiki.net
1- If you are reading this tutorial while you are playing Minecraft, it's recommended that you go to the Minecraft window and press Esc to pause the game. By doing this, you will have plenty of time to gather resources and create a shelter for the night, and monsters will not come up and kill you while you are away.
Before you start, you should learn the controls for the game. A full discussion of controls on all platforms can be found on, naturally, the Controls page. Here we discuss the default PC (and Mac) controls. Most of these can be changed in the Options menu (which can be reached from either the main menu or the pause (Esc) menu. There is one case (see below) where you really do want to change the default....)
2- As Minecraft is a sandbox game, there is no defined or proper way and style to play the game. However, in Survival mode one common theme found for all players is the need to feed yourself, and to avoid (and later, fight) hostile mobs that spawn either in dark places (e.g. caves) or when night falls.For your first night, you will need Wood, Cobblestone, and, ideally, Coal or Charcoal to have a fighting chance. Wool for a bed is optional, but very helpful -- it lets you skip the night and avoid the monsters that appear then. While you're working on the basics, collect any stray items you come across, as many of them will be useful later. (Notably eggs, seeds, and anything dropped by monsters e.g Zombie Flesh, Bones and Arrows.)You need to get your resources and find or make either a bed or a shelter before nightfall, because that's when the monsters come out. It is best to work quickly, as a Minecraft day is approximately ten minutes and night is ten minutes, including dawn and dusk. If at all possible, build your first shelter very close to the spawn point, so if you die, you can easily find it again. Note that when you die in Minecraft, all items you were carrying or wearing in your inventory are scattered around your point of death, and you will respawn at your original spawn point unless you have slept in a bed. Like any dropped items in Minecraft, your scattered inventory will disappear after 5 minutes (unless you're more than 180 blocks or so away, which is a lot for your first night).Your next priority will be food. Hunger will take a while to hit, so it shouldn't be a problem on your first day, but you'll try to get a little bit for when it does. After you've been moving around for a while, your food bar will begin rippling and start to decrease. If it drops below 90%, you will not regenerate health, and if it gets to 30%, you can not sprint. If the hunger bar goes down to empty, you will begin losing health. Unless you're in Hard Mode (and a beginning player shouldn't be), you can't actually die of hunger, but you will go down to 1 hit point 1 (), which makes you very vulnerable.For nightime, the primary danger will be monsters. It is a good idea to start gathering resources and construct a lit shelter immediately after you begin on the first day. As a beginning player, do not try to fight monsters your first night, because you have lousy weapons (or none at all), and you have no armor.
3- When you begin the game, you will be standing in a landscape somewhere. Take a moment to look around. This is your "spawn point", where you will reappear if you get killed. It's a good idea to mark it immediately, by punching out an X of dirt and/or sand, then using the dirt or sand to build a pillar in the middle of that. If you're standing on rock, look around for some dirt or sand to use, remember where you are, and go get it to build your pillar. Before you move,you may want to hit F3 to show the debug info, then hit Esc to pause the game, and write down the coordinates where you started. Also notice what biome you're in. Then go back to the game and hit F3 again to get rid of the debug info until you need it again, as it's distracting and in the way. Now, consider where you are:This assumes you are playing single-player -- if you are entering a multi-player game, you will not be able to change blocks near the spawn point, and will have to move some distance away before you can start gathering resources. But for any number of reasons, you really should try a single-player world for your first game....
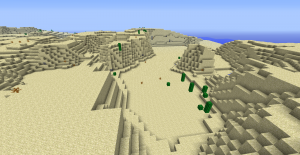
4- If you are standing on and surrounded by sand, you are likely in a Desert biome. After marking your spawn point, head for high ground and look around for green ground and/or trees (Cactus and sugar cane don't count). Head that way to gather your wood. If you can't see anything but desert, pick a random direction and head that way, occasionally going to high ground for a look around.If you are on an island, completely surrounded by water as far as you can see, you are in an Ocean biome. This is a very tough start, but if you don't want to just delete the world and start over, you can just start swimming until you reach land (hold down space to keep yourself afloat), then continue.In either case, "looking around" is a good time to increase your render distance to Far.If, looking around, you see purple land and/or giant mushrooms, your game just got a lot easier: That Mushroom Biome will not spawn monsters. Monsters can still come in from other biomes, but if you head toward the middle, you can spend the night in safety outdoors. Also, with a wooden bowl, you can get free food from the Mooshrooms which live there. However, one thing the Mushroom biome does not have, is wood -- so before you go there, head for green territory to get some wood and stone first.If, looking around, you see houses and/or farms, you are near an NPC Village. Unfortunately, that's not actually a good place to spend the night -- they do have houses that shelter against nighttime mobs, but they also have zombie sieges, where zombies can appear inside the houses. In fact, the villagers are likely to get wiped out before you have a chance to properly trade with them, but the destroyed village will still have a lot of resources for you, usually including farms that will immediately solve your food worries.
5- Look around for a few things in particular, in order of priority: trees, visible stone (and especially coal ore), animals, and tall grass. As you move around, break any tall grass in your way, and collect any seeds that drop. For that matter, collect any loose item you see, as most of them will eventually be handy. Your first priority is to find a small tree, bash through the leaves if needed, and punch the wood until each block drops as an item. Don't bother with huge trees at this point, but also don't be upset if you can't reach the top blocks of wood -- you can always come back and collect them later. This first tree should give you at least 4 blocks of wood ("logs"). You'll punch more wood in a moment, but it's probably best to make a couple of tools first.
6-Your first craftingAs the game's name suggests, crafting is core to Minecraft. While there are a small amount of items that can be crafted directly from the inventory, a Crafting table is required to craft tools and most other items in the game. Naturally, the crafting table can be crafted from the inventory!To make your crafting table, first open the inventory (E) and click on a stack of wood logs once collected from a tree: Then place some of the wood in the 2x2 crafting square above your inventory. This will produce planks: The planks will be different colors depending on what sort of wood you have. Different types of wood don't stack together, but all work the same. With a couple of exceptions (slabs, stairs) you can mix and match different planks when crafting. In particular, sticks don't care what sort of wood they came from, they all stack together.Left clicking on the plank icon will craft four planks for each click, using up one log. (If you hold down shift and click left mouse button it will convert all the wood you put there into planks.) At this point, you want to convert at least 3 logs into planks, and you can do more if you want. If you want to save some logs, click on the remaining wood in your 2x2 crafting square and return it to your inventory. Click on the planks you just crafted and instead of left clicking, right click once in each of your four crafting squares. (This drops one item, instead of all items, each click.) Return the remainder to your inventory.You should see this (with the exception of the 3x3 grid of slots, you will only see a 2x2 grid for now):

7- Your first tool(s)In order to collect stone and coal, the next staple resources, you will need a pickaxe. Your first pickaxe will be made of wood; not very durable or fast, but until you collect some stone, which is why you need a pickaxe in the first place, it's all you have.You will need at least five planks to make one wooden pickaxe. Use your crafting table by right clicking on where you placed it. Your crafting table view is similar to your inventory view, except you now have a more useful 3x3 crafting space. First we need to make a handle for your pickaxe. To do this, pick up a stack of planks and place one above another anywhere in your crafting square. Two planks produces four sticks: To create your pickaxe, you'll use some of the planks and sticks you've just made. Arrange them in positions shown on the picture below. You may have noticed that in order to craft a pickaxe, you more or less draw it with its components in your crafting square. Other items are crafted in a similar fashion. At this point, you could go on to create a wooden axe, but you're better off going straight for stone....

8- Now, you should gather more wood, using your new stone axe. Don't turn it all into planks up front -- you may need a few logs for charcoal (see below). Although some trees (and their wood) look different than others, all wood functions the same. However, different kinds of wood don't stack together, which can take up extra inventory space. You might notice also that the tree's leaf blocks slowly disappear, or decay after you cut down all the wood. When the leaves decay when all wood blocks are destroyed, they can drop a sapling, or rarely an apple. Later on, you can use saplings to grow more trees, but just save them for now. For now, harvest a decent amount of wood (perhaps 16 blocks or so, but mind the sun). While you're at it, you should also dig (with the shovel) 16 or so blocks of dirt, in case you need to make a pillar or a quick wall when night comes.If the sun is still in the sky, explore immediate vicinity for some stone with black specks in it. This is coal, another essential item in Minecraft which can be used to create torches and more. If you cannot find some, don't worry: you can make charcoal from wood blocks in a furnace. Charcoal has the same properties as coal.You aren't too much in need of iron right now, but if you do find any iron ore (looks like stone with tan specks), go for it (you do need the stone pickaxe first). Don't be greedy -- if it's over a large cave or ravine, much less next to lava, leave it for later.
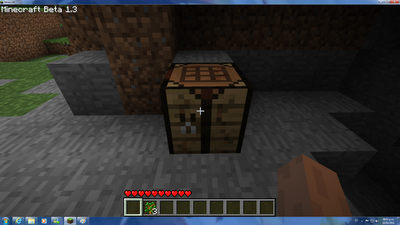
9- Heat before lightInitially, your sole light source in caves and at night will be torches. These are made from coal and sticks. If you haven't found coal, you will need to make charcoal instead. Either way, you will also want to cook your meat before you get hungry.To do this you need a furnace. To create a furnace, arrange eight cobblestone blocks in a ring on your crafting table.
10- Bed and shelterIf you have made a bed, nightfall is easy: As soon as sunset begins, place your bed, sleep in it by right-clicking on it, and continue with crafting and smelting the next day. (Hint: Music plays at dawn, noon, sunset, and midnight.) It's probably good to set up a shelter anyway, but if you run out of time, you can sleep anywhere, as long as there aren't already monsters near you. However, the other thing a bed does, is to set your spawn point (where you reappear when you die), but that part only works if you leave the bed there. So for the first night, you might just use the bed and then take it with you, but eventually you will want a safe shelter where you can sleep in your bed and leave it there permanently.If you have no bed, and you didn't have time to build something secure, you will probably have to spend your first night in an emergency shelter. For some of these options, you can make torches and cook food overnight, but for the underground options, you really want to have some torches handy before you close yourself into the darkness.Here are some options for quick shelters:
11- Getting above it allBuild a tall 1x1 column under you, by pillar jumping: look straight down, jump up, and place one of your blocks in the space you've jumped up from. By doing this repeatedly, you can get high enough above the ground that the mobs will be unable to detect you. 10 or 12 blocks will usually be enough, but 16 or 18 is more certain. You will then need to wait until morning. You can also use "crouching" (holding ⇧ Shift) to lean over the edge of your pillar and place an extra block or two as a ledge. Then you can put your crafting table (and soon, your furnace) on the ledge and work overnight. (Remember to retrieve them before you come down.)Once it is light enough, and the undead have burned, simply dig out the blocks you're perched upon, until you're back on the ground. (Check for nearby creepers first!) Don't just jump off your tower - if you're high enough to avoid mob detection then you're high enough to take damage if you jump, or even die if you're 22 blocks or more up. Also keep an eye out for spiders, which can meet you halfway and knock you off the tower.You can make the pillar out of dirt, wood planks (remember, 4 planks to a log), or even cobblestone, but avoid using sand or gravel to make your tower (see below).Watch out for climbing Spiders or even (unlikely) a Spider Jockey. To fend off spiders, you can break one of the blocks below your top block, or build a lip around the block you're standing on by holding ⇧ Shift, sneaking far enough over the edge to see the sides of the blocks and place blocks on those edges. You will not fall unless you let go of ⇧ Shift while leaning over the edge... or unless you are attacked. If there are mobs nearby, then it's not worth the risk to do this, just be prepared for the spiders, with your stone sword in hand. (Attacking them will knock them down, and they will also take damage from the fall.)The reason not to use sand or gravel, is because unlike most blocks, they are affected by gravity: You won't be able to place a ledge with them (it will fall to the ground). Also, if a creeper does notice you, and blows up at the bottom of your pillar, the rest of sand you're standing on will fall closer to the ground, taking you with it... and apparently, you were already low enough for monsters to notice you.If you are in a desert with only sand and cacti all around, and have no other blocks available, don't try to use cacti (they'll kill you). If you have time, try to gather a lot of sand. If you got at least 40 or 50 by nightfall, you can make enough sandstone for a pillar: Press E for your inventory and crafting window, divide the sand among all four boxes of your crafting grid, and take the result. Sandstone isn't very strong, but isn't affected by gravity either. Unfortunately, you need 4 sand to get each block of sandstone. If you could only get 15 or 20 blocks, you can make a sand pillar and hope it's tall enough.
Hope it help you and sorry for making it so long ( i think all this information is necessary) See you next time :)
Here i leave you a video link: Youtube.com


Abit Wall of texty, but quite helpful nevertheless!
If anyone really needs such information, why wouldn't they go to the Wiki? I really wish Kizzy was back to moderate things like this..
A good tutorial, pictures could make it easier to read and would remove the need for a fair amount of the text though. A picture is worth a thousand words as the saying goes :)
I thought it was just "punch tree, get wood" now there's all this B.S.
when i found this information, i thought the same xD
This comment is currently awaiting admin approval, join now to view.
This comment is currently awaiting admin approval, join now to view.