
Tutorial written by Sayantan (Satan) Biswas
Mirrored here for archival purposes. Note this is an unofficial tutorial the official Remedy tutorials are located here.
Creating Skyboxes for Max Payne by Sayantan (Satan) Biswas
Welcome & thanks for visiting my tutorial.»
In the following tutorial you will learn how to make a totally new SkyBox, or Worldsphere, for Max Payne. Before I start the tutorial, please read the following disclaimer.
DISCLAIMER
- Software used: Photoshop 7 and 3d Studio Max R4.
- Software used: Photoshop 7 and 3d Studio Max R4.Only 3dSMax R3.1 to R4 have the capability to export a 3D mesh into the Max Payne format (.kf2).
- You should know at least the basics of Photoshop and 3dSMax.
- If you just want to manipulate an existing skybox texture and reuse it, then this tutorial is not for you.
- The methods used in the following tutorial are entirely my own concept. If anyone finds it to be incorrect at any part then please mail me. I’ll try to correct it.
- Max Payne doesn't support animatable Skyboxes. I’ve tried all the possible ways to export animations (whether it’s for themesh or for the texture), but it’s of no use.
- I won’t be responsible if this tutorial crashes your system or causes some major losses to your PC. So USE AT YOUR OWN RISK.
INTRODUCTION
The tutorial consists of part with Photoshop as well as 3d Studio Max. I was going to make a graveyard for a ChainMap. Inthat map I had to make a totally new skybox to create that spooky atmosphere. Well I couldn’t finish the map becauselack of time and my studies, so I decided to make a tutorial of the skybox part. My intention is not to teach how I made myown Skybox, but to make the basic concept of skybox creation and manipulating clearer for the newbies.
How does the SkyBox work in Max Payne?
Well the basic concept of a skybox in Max Payne is that certain portions of a Max Payne level would have the “Skybox”texture applied to it. While playing the game, the engine would show these parts empty and show the inside of a 3D mesh,that was made in 3dSMax or something similar, thus simulating an endless sky. Well I ain’t a programmer, but I could saythat it’s programmed in such a way that ingame, no matter wherever you are, the pivot of the skybox is always at thepoint where the camera at that moment lies, ie the skybox always moves with the player’s default camera while playing.Whereas it doesn’t rotate with the camera at any moment, creating a feeling that the sky is endless like it looks in realworld. You can use any mesh which is closed down, ie a cube or a sphere or even make strange alien kinda skybox like Heavy Metal FAKK2 and Alice.
Getting Started With Photoshop
Firstly open Photoshop and make a new file. In the option window, under “content” select “White” , select “RGB” modeand make a new file of 512 * 512 pixels. Then in the Menu bar go to Filter>Render>Clouds You’ll get something like the following.
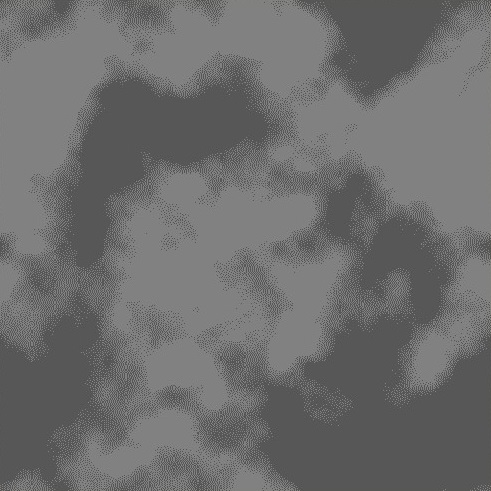
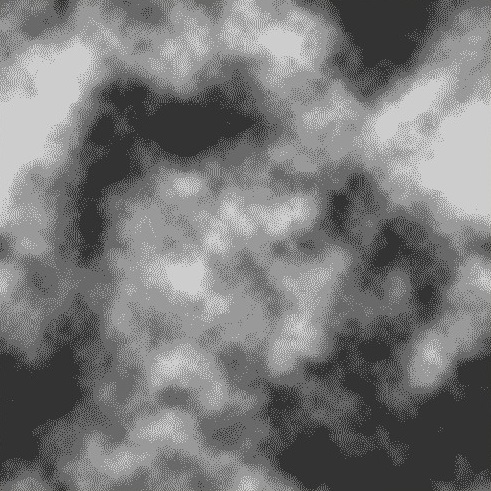
Well not exactly like the above but a bit of better quality.Then again in the Menu Bar, go to Image>Adjustments>AutoLevels. You’ll get something like the following.
[NOTE: If you want to make the colour of the sky a bit different, then do so by going to the Image>Adjustments>ColorBalance in the menubar. Keep the preview checked and keep on manipulating untill you are satisfied.] Now save the file as“CloudySky.jpg”. Set the quality to maximum while exporting. There! You finished making a nice cloudy texture for the skyand now you just have to make a stupid mesh for the texture to lie on.We’ll use 3dSMax for making that mesh.
Getting the SkyBox mesh ready in 3dSMax
[NOTE: The number of polygon used in the Skybox mesh vastly affects the speed of the game. SO BEWARE OF HIGHPOLYGON COUNTS. But at the same time you shouldn’t use very low poly mesh as they would make the sky look really cheap…..which would be something like A5/3d Game Studio……LOL…..]First make a sphere perfectly at the centre of all the viewports. To make sure it is at the centre, select it, then click on the move button ![]() on the tool bar and then right click on it one more time. A “move transform typein” window will open.
on the tool bar and then right click on it one more time. A “move transform typein” window will open.
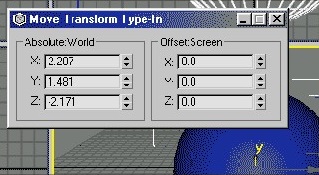
Now in all the coordinates under the “Absolute:World” section, put “0” and close the window. Now your sphere is perfectly at the centre of every viewport. To increase or decrease the number of polygons or even the size of the mesh, firstly go to the “Modify” tab at the rightmost corner of the screen.  Then below that, change the settings asshowed in the picture below (do it right now but after you learn it well, change it according to your needs).
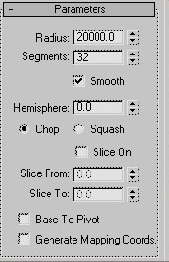
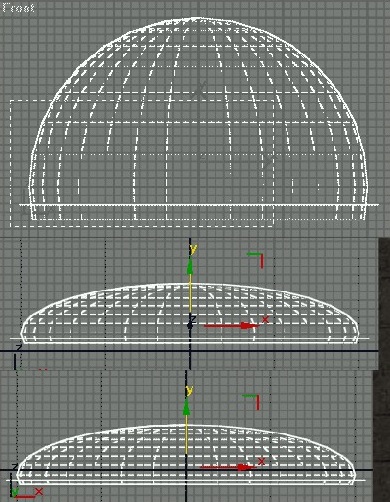
[NOTE: I used the radius to be 20,000 units because Remedy used perfectly that big of a mesh with 32 segments for the“Sunset” skybox.] After that, click the "Modifier List"dropdown menu. A list of many modifiers will be shown in a categorical way among which, click the “Edit Mesh” modifier under the “Mesh Editing” category. Now in the subobject level, select “Polygon” and select the total lower hemisphere of the sphere in the front viewport, leaving the top most series of polygons.
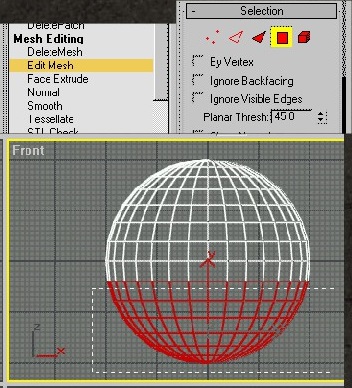
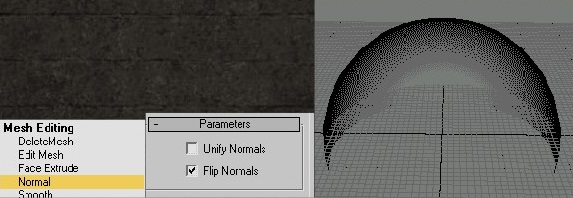
Now delete these polygons. You’ll be asked whether you want to delete isolated vertices or not. The answer would be“Yes”. Click that red square once again to come out of subobject level. Now we are ready with our skydome mesh. But something is really missing in the mesh. Yes, we will be seeing the skydome from inside, so it’s faces should be flipped inwards.So select the mesh once again and bring down the modifier list. In the modifier list, click the “Normal” modifierunder “Mesh Editing”. Then check “Flip Normals” and your skydome should look something like this. Modelling the skydome is ready.
Making the ground for the Skybox
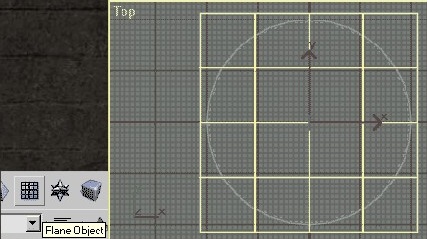
Now we have to make a ground where the sky would meet at the horizon.Go to the Objects menu and select “Plane”. Now draw out a more or less equal sided plane in the top viewport, which would be slightly bigger than the diameter of the sphere.
[NOTE: We won’t need to flip the faces of the plane. Since it will be the ground, we are going to see it from the top while ingame.]
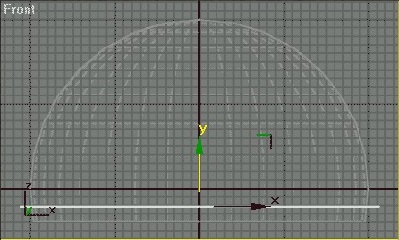
Now move the plane in the front viewport down so that it is just above the lowermost margin of the skydome like in the picture below. As far as there is no leakage at the joining parts of the meshes, it’s perfectly ready.
[NOTE: The main reason why I used a plane for the ground instead of keeping the sphere is that, I wanted to keep the polygon count as low as possible.And since I’m making a dark night sky, the ground would be perfectly dark.So there’s no necessity of keeping a lot number of stupid polygons over there.]
If I were to use a noncloudy texture, then my modelling would have been ended at this particular moment.But clouds arefar more lower than the sky. So now I need to squash the total skybox to make it of lower height. Firstly select both the skydome and the plane by dragging out a rectangle with the select tool in the front viewport. ![]()
Now keep pressing the “Uniform Scale tool” in the main toolbar for a moment or two and some other tools would dropdown. From the list select “Nonuniform Scale”.![]()
A popup will ask you whether to continue or not. Press “yes” in it. Now scale them just like I’ve shown in the following pictures . Now move the skybox slightly downward so that the grid centre lies just a bit above the plane.
[NOTE: I did the previous move because by default while exporting into Max Payne’s (.kf2) format, the grid centre is regarded as the pivot centre of the skybox, if not specified.]
Okay now we are perfectly ready with our modelling part. Next we will go to the texturing part.
TEXTURING THE SKYBOX
[NOTE : To understand how the texturing is affecting the mesh, we will put a camera inside the skybox and change the“Perspective” viewport to that Camera. If you are unsure about placing the camera, Don’t Panic! Learn it from the official help file.Only while exporting the skybox, we’ll delete this camera because its purpose would be served at that time.]
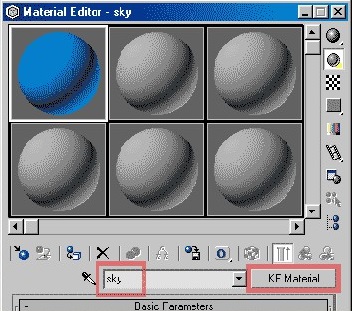
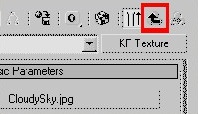
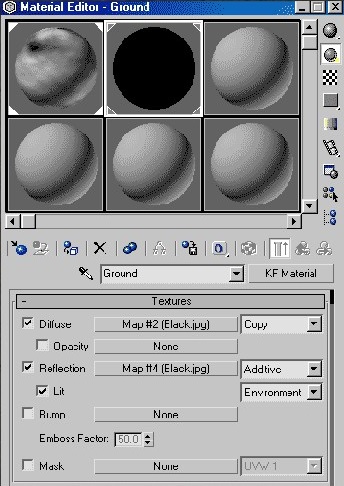
Firstly select the sphere used as the sky and press “M” to open up the Material Editor. Now rename the first material to“Sky” and press the “Standard” button beside it and then select “KF Material” within it. Let the “Basic Parameters” as it is.Come to the “Textures” section and press the “None” button beside it’s written “Diffuse”. Now a list will come and from there you are to select “KF Texture”.Now press the blank button beside it’s written “Bitmap” in the “Basic Parameters”. Now browse on to the “CloudySky.jpg” we just made in Photoshop.After that click the “Go To Parent” button to go to the root directory of the material.
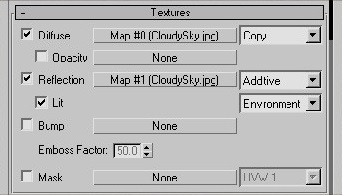
Leave the “Opacity” as it is. Check "Reflection" and change its type from the drop down list to "Additive" and again press the “None” button beside it. Once again select the “CloudySky.jpg” through the exact process we did with the “Diffuse”texture. Come again to the parent directory. After that check "Lit" and change its type from the drop down list to"Environment". After that the “Textures” panel of your Material Editor should look something like this.
Then drag and drop the material shown in the sphere in the Material Editor to the Hemisphere in the viewport. Now make another similar material and name it “Ground”.For its texture I used a simple black 2 * 2 pixel bitmap and named itBlack.jpg. Then once again drag and drop the material on to the plane in the viewport. Is there any problem you are having? YES, there ought to be problem, that is the materials are not showing up properly in the viewport. For the material to show up, you must first give a “UVW Map” modifier to the Sky mesh as well as the ground mesh.
[NOTE: The KF Texture has no texture tiling option. So we would only be able to tile the texture properly with the help ofthe “UVW Map” modifier.]
TILING THE TEXTURE
Close the Material Editor. Now select the sphere and go to the “Modify” panel and open up the modifier list once again. In the modifier list under “UV Coordinate Modifiers”, you’ll find “UVW Map” modifier.
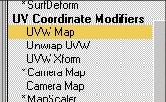
Select it and under its parameters, select “Shrink Wrap”. There you’ll also see U tile, V tile and W tile. Try altering those values for the sky to make the tiling perfectly of your wish. I used 5, 5 and 5 as its value. That was quite okay for me. Sonow you can easily see the clouds being tiled on the sky in your viewport camera. Try rotating the camera to see how it looks at all parts of the sky mesh. Now you have to do the exact same thing for the ground mesh of the sky. But instead of“Shrink Wrap” use a “Planar” tile and utterly any value for the U, V and W tilings. That’s it, the total construction procedurals over. Now the only thing which is left is the exporting.
EXPORTING THE SKYBOX or WORLDSPHERE
Before we would export the skybox, we should delete the camera we created for looking at the tiling effect of the skybox. Then go to File>Export.
[NOTE: Don’t use “Export Selected” or the whole thing won’t export. ]
Now in the “Save as Type” drop down, select “KF Exporter(*.kf2)”. In the “File name”, type on “Cloudy” and click on“Save”. An Export Option window will open.

Now in the Export Option window, check only the “Geometry” and the “Materials”. Also don’t forget to check the “ReScale” and its value to “0.01”. You should also check the “Copy textures to export path” option. Lastly press “OK” and you are done with your skybox modelling, texturing and exporting process.
Finishing Text Edits
Lastly put the “Cloudy.kf2” and its adjacent “textures” folder into the “data\database\worldspheres” folder. Then edit theWorldSpheres.txt and add the following text either at the beginning or at the end so you can find it out easily:
[Cloudy] // My self­made WorldSphere
{
[Geometry]
ExportData = Cloudy.kf2;
}
Then in the levels.txt in the “data\database\levels” folder put Cloudy in the part where the name of your previousworldsphere was written. After that you are done. Go compile your level and play on to see your just made new skybox.
CONCLUSION
Since now you know what is the process to make new skyboxes, let your minds flow for creativity. There is simply no restriction for the type of Geometry you are gonna use, unless and until you are making everything closed down ie; NOLEAKS. Right now all I can think of is to make an area surrounded by high buildings which wont at all look like curvy sinceu’ll use planes only for the buildings. This is one of the other reason why I like Max Payne so much. Or you can also make some alienated worldspheres filled with strange but exceptionally modernized geometry. Everything is possible but do remember to think about optimization and so the gaming experience doesn’t slow down. Thanx a lot for reading this tutorial. I hope you’ve enjoyed to read it as much as I felt composing it.
SPECIAL THANKS TO
- Hairless Wookie…………..for giving me some ideas in the past.
- Endo…………..for providing the maximum number of modelling tutorials to newbie Max Payne modders. I really got thetutorial writing enthusiasm after seeing Endo posting so many tutorials at MPHQ.
- SamiV (3drealms forum)……………..for showing us the way that animation is possible in a Max Payne skybox.
Later Additions
Further on, Sami Vanhatalo of Remedy Entertainment confirmed in the 3dRealm’s Max Payne Modding Forum that Animation is surely possible in Worlspheres in Max Payne. The correct way to do it is:
While Exporting
Also check the “Animation” and the “Loop When Finished” check box.
In The Text Edits
Type the following down (if you have made an animation with the given skybox)
[Cloudy] // My self­made WorldSphere
{
[Geometry]
ExportData = Cloudy.kf2;
[Animation]
Index = 0;
Filename = Cloudy.kf2;
}
Thanks A Lot to SamiV for that information.
So what else could be better than this. Go on and add that extra “EyeCandy” animation to your already made Skybox. Till Max Payne 2, Good Bye.
And don’t forget to mail me questions or suggestions about this tutorial.
Date: Late 2002/Early 2003 (approx.)


Thank You very much for this tutorial!
you're welcome