Gigantic masses of Nuclearite clouds shatter the Earth's moon. The moon's fragments with radioactive Nuclearties fall to the Earth, causing the greatest catastrophe in its history. The catastrophe leads to dramatic changes of the Earth. The survivors begin to mutate due to the radioactive environment into something more... violent.
This article by Thomas Mooney, author of Unreal Development Kit Game Design Cookbook contains lessons in adjusting configuration, scripts, and even supplying additional actors and Kismet actions. Everything here is about altering the editor or gameplay settings to provision a customized playing experience:
- Groundwork for adjusting configuration defaults
- Enabling the remote control for game inspection
- Changing the Play in Editor view resolution
- Removing the loading hints and similar articles
- Editing DefaultEngineUDK to allow 4096x4096 texture compression
- Setting the preview player size reference object
- Binding a keyboard shortcut to a player action
Unreal Development Kit Game Design Cookbook
(Over 100 recipes to accelerate the process of learning game design with UDK book and ebook.)
Groundwork for adjusting configuration defaults In this article we'll build up from simply changing some trivial configuration settings to orchestrating unique gaming experiences. To start out, we need to make clear how UDK configures content under the hood by introducing the layout and formatting for this kind of file. The experience in this recipe can be likened to savoring morsels of cake samples in a shop before committing to a purchase; while you're not actually changing major settings yet, the aim is to make some tasty observations so later the changes you make will come from informed decisions.
Getting ready
In your UDK installation, you have a folder called C:\UDK\~\UDKGame\Config and it is worthwhile to browse the files here and get to know them. Treat them like the faces of colleagues in a new company. It may take a while, but you'll eventually know all their names! You may want to make an alternative install of UDK before starting this article, to protect any content you've been working on. In these examples we're going to assume you are using ConTEXT, or a notepad alternative that highlights UnrealScript syntax, like those listed at Wiki.beyondunreal.com. The advantage with ConTEXT is that you have a history of recently opened files, and several concurrently open files can be arranged in tabs; also, you can view specific lines in the file in response to line error warnings from the UDK log, should they arise.
In ConTEXT, to display line numbers go to the Options | Environment Options menu then click on the Editor tab in the options dialog, tick on Line Numbers and press Apply.
How to do it...
- Open the file C:\UDK\~\UDKGame\Config\DefaultCharInfo.INI using ConTEXT. Alongside it, open C:\UDK\~\UDKGame\Config\UDKCharInfo.INI, which is a rather similar file.
- Values we set from an existing class are presented after a reference to the class in square brackets which surround the folder and class name, such as [UTGame.UTCharInfo].
- Commented out lines or notes are distinguished using ; and the entire line isn't parsed. This differs from the // used to comment out lines in UnrealScript.
- In some configuration files you will see BasedOn=... followed by the path to another configuration file. This helps you track where the info is coming from.
- Values for variables are set in the configuration file as in the example: LOD1DisplayFactor=0.4.
- In ConTEXT , click on File | Open... and scroll down the list of files. Notice that it previews the contents of the highlighted .INI files before you open them.
- Choose DefaultWeapon.INI and edit line 3 (strictly speaking line 1 is empty). Press Ctrl + G (or View | Go to Line) and enter the line number 3. This line specifies CrosshairColor for the weapon. If you change the value A=255 to A=0 you will effectively have hidden the weapon target.
- Supposing you wanted to do so, you'd just have to save this file then reload UDK. No compiling is needed for adjusting configuration files, unlike classes, unless the configuration is defining custom scripts to be used in some way.
- Let's assume for now that you don't want to hide the weapon cursor, so close the file without saving by pressing Ctrl + W and choose No for the file save option.
- Open the file UDKEditor.INI and go to line 12: Bindings=(Key="S",SeqObjClassName="Engine.SeqAct_PlaySound") then look at line 28: Bindings=(Key="S",bControl=true,SeqObjClassName="Engine.SeqEvent_LevelLoaded").
- What's important here is the added bControl=true for the S key. S will create a Play Sound node in Kismet. Ctrl + S will create a Level Loaded event.
- We really don't need to change anything but you can, for instance, change Ctrl + S to Ctrl + L in line 28, for adding a new Level Loaded event node in Kismet: Bindings=(Key="L",bControl=true,SeqObjClassName="Engine.SeqEvent_LevelLoaded") .
- Make sure that UDK is closed before you save the change or the file will not be effected at all. Reloading UDK after saving the change will see it take effect. Unless you have very long hands you will probably want to test this using the right Ctrl button on the right-hand side of the keyboard so your fingers can hold L and Ctrl and left mouse click all at once. You should get the Level Loaded event in Kismet from this key combination now.
- On that note, when you are specifying hotkeys for your game, bear in mind the idea of user friendly interface as you decide what keys to use. Often used keys should be easy to remember, fast to reach, and possibly semantically clustered together.
How it works...
What we looked at in this recipe were some formatting features that occur in every configuration file. In particular it is important to know that edits should be made while UDK is closed or they get scrubbed back out immediately. Also you will have noticed that the values we change reference UnrealScript classes from the C:\UDK\~\Development\Src\ folder, and reading through their layout can help you learn how the default content in UDK is made to work during gameplay.
There's more...
Consider a version control software for editing UDK content
There is a free version control system called Bazaar ( Bazaar.canonical.com) that integrates with Windows folders. What version control software does is keep track of changes you have made to files, protecting them through a history based backup that lets you review and revert changes to a previous state if needed. You can init a folder, then browse it, add content and commit changes to changed files with comments that help you track what's going on. Where needed you can review the change history and revert files to any previously committed state. Alternatives to Bazaar are the commercial tool Alienbrain Essentials for Artists, or the free repository TortoiseSVN. The utility of version control in the case of UDK development is to prevent unrecoverable problems when doing a script compile when changes haven't been tracked and therefore can't be restored without re-installing from scratch, and to allow assets to be overwritten with a history.
Enabling the remote control for game inspection This is a method for turning on an extra feature of UDK called the Remote Control that can be used to manipulate render nodes, inspect Actors, and evaluate performance.
How to do it...
- In Windows, go to the Start menu or your desktop and find the shortcut for the UDK Editor and right-click on it to expose its properties.
- In the Target field edit it to read: C:\UDK\~\Binaries\UDKLift.exe editor -wxwindows -remotecontrol -log.
- The main point of this entry is so that we can launch a tool called RemoteControl. The usefulness of running the -log window increases over time. It is used for tracking what is happening while you run the editor and PIE. When trouble shooting problems in Kismet or with missing assets for example, it is a good first port of call for seeing where and when errors occur.
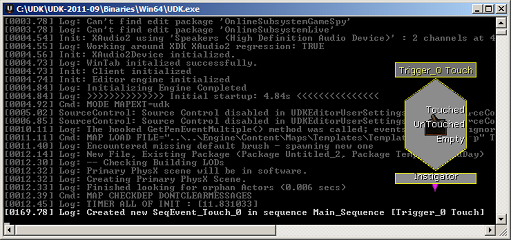
- In the following screenshot, the log shows the creation of a Trigger Touch event in the main Kismet sequence based on the actor Trigger_0 in the scene:
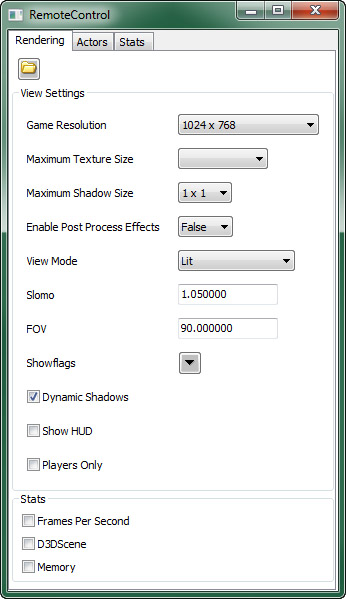
- Having edited the UDK launch properties to allow RemoteControl to launch, now load the Midday Lighting map template and PIE (F8). If you press Tab and type remotecontrol you should get a pop-up window like this:
- If you hit the Actors tab you get access to properties of certain actors, and you can change properties live while playing. For example, expand Actors | DominantDirectionalLight and double-click on DominantDirectionalLight_0 . Then in the light's property Movement | Rotation | Yaw or Pitch, try out different angle values. However, the changed values will revert to the editor state after PIE is closed.
- See also: Udn.epicgames.com.
- An additional note: if you happen to minimize the RemoteControl window in some cases it may stay like that until you press Alt + Space . And to swap between the game and the Remote Control window press Alt + Tab .
- Pressing Show Flags lets you display various elements of the scene such as Collision, Bones, and Bounds.
- Go to the Stats tab and tick on Memory in the listing, then expand it and tick on the item within it called Lightmap Memory . This shows the cost of displaying lighting backed into lightmaps.
- Further down in the Stats tab list, tick on the item D3D9RHI and look at the DrawPrimitive calls. In the game, look straight up at the empty sky and note the value. Now look at the box on the ground. Notice the value increases. This is because the view has to draw the added objects (ground and box). In a large scene, especially on iOS, there is a functional limit to the number of drawcalls.
How it works...
The RemoteControl tool is external to the game window and is created using wxWindows. It is meant for use during PIE, for evaluation of performance. The Actors tab shows us a tree list of what is in the level, along with filters. You can access Actor Properties for an actor under the crosshairs using the icon [![]() ] or access them from a list.
] or access them from a list.
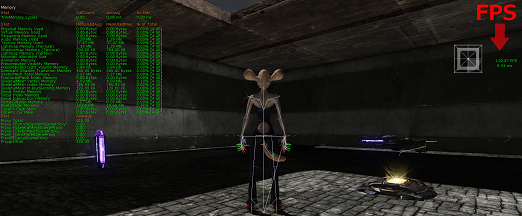
What you see in this screenshot is the result of turning the memory statistics on within a scene and the frame rate indicator (FPS = frames per second) through the Rendering tab in the Stats section, as well as the display of bones used in the scene. In Remote Control , you can set the Game Resolution (or game window size) under Rendering | View Settings. In the next recipe, we'll look at how to do this in UDK's configuration.
Changing the Play in Editor view resolution This is a very short method for setting the view size for PIE sessions.
How to do it...
- In C:\UDK\~\UDKGame\Config\DefaultEngineUDK.INI press Ctrl + F and search for [SystemSettings]. This should expose the lines: [SystemSettings] ; NOTE THAT ANY ITEMS IN THIS SECTION AFFECT ALL PLATFORMS! bEnableForegroundShadowsOnWorld=False bEnableForegroundSelfShadowing=False ResX=1024 ResY=768
- Change the ResX and ResY values to suit yourself, using screen resolutions that make sense, such as 1920x1080.
- This will update UDKEngine.INI in the same folder so you will see the change reflected in these lines: PlayInEditorWidth=1920 PlayInEditorHeight=1080
- Load a level and PIE to see the difference. Note that if you update UDKEngine.INI directly it will just revert to whatever is set in DefaultEngineUDK.INI. There is a lot of redundancy built into UDK's configuration that takes some time and practice to get used to.
Removing the loading hints and similar articles Quickly getting rid of all the peripheral text and imagery that wraps around a given level, especially in console mode, is not easy. A few options exist for removing the more distracting elements such as splash screens and menus. You may want to do this if you wish to show your work without any artwork made by someone else getting in the way of your own. One method is called destructive editing, where your delete or blank out assets at the source, and this isn't as safe as it is quick. Instead you can provide your own menus, splash, and UI by extending on the classes that call up the default ones.
How to do it...
Removing the console mode videos during map loading
- Open C:\UDK\~\UDKGame\Config\DefaultEngine.INI.
- Press Ctrl + F and search for [FullScreenMovie] , which should expose the startup and loadmap references.
- Comment out the entries as follows: [FullScreenMovie] //+StartupMovies=UDKFrontEnd.UDK_loading //+LoadMapMovies=UDKFrontEnd.UDK_loading
- Load a level and play in console mode [
 ]. You won't get the movies that precede gameplay. If you take out all the pre-loading content there may occur the problem of getting a look at the level too early and "pre-caching" showing up.
- To learn how to instead swap out the .BIK files that constitute the loading movies between levels you can follow the video by Michael J Collins: Youtube.com.
Removing the level loading hints
- To totally prevent .BIK movies during development, you can open C:\UDK\~\Engine\Config\BaseEngine.INI and search for NoMovies, then adjust the FALSE in the exposed lines: // Game Type name //class'Engine'.static.AddOverlay( LoadingScreenGameTypeNameFont, Desc, 0.1822, 0.435, 1.0, 1.0, false); // becomes class'Engine'.static.AddOverlay( LoadingScreenGameTypeNameFont, Desc, 0.1822, 0.435, 1.0, 0, false); // and Map name // class'Engine'.static.AddOverlay( LoadingScreenMapNameFont, MapName, 0.1822, 0.46, 2.0, 2.0, false); // becomes class'Engine'.static.AddOverlay( LoadingScreenMapNameFont, MapName, 0.1822, 0.46, 2.0, 0, false);
What's happening here is that the last digit of four in an entry 1,1,1,1 is the Alpha value, controlling transparency, so 1,1,1,0 will be invisible. The first three numbers are RGB values, but they can be anything if the Alpha is 0.
Removing the default exit menu
- Open C:\UDK\~\UDKGame\Config\DefaultInput.INI and press Ctrl + F to search for Escape. The first time will expose a removed key binding, so search from the cursor again to find in line 205: .Bindings=(Name="Escape",Command="GBA_ShowMenu" and comment it out with ; then add this line underneath instead: .Bindings=(Name="Escape",Command="quit" if UDK should close directly.
- If you want to provide a custom menu type: .Bindings=(Name="Escape",Command="open Menu" , where players pressing Esc will be sent to Menu.UDK (a scene of your own design) instead of the default menu. This won't do anything if you don't provision a Menu.UDK map first and cook it with your game levels. The map Menu.UDK would typically include some kind of clickable exit, resume, and reload buttons.
- If you want Esc to automatically restart the level you're playing, put in "open YOURMAPNAME" but bear in mind the only way to exit then will be Alt + F4.
- Possibly a strong way to approach the Escape option is to have a Pause command that permits a choice about leaving the game through a floating button: Resume or Exit. In addition you might have a similar floating button when the player dies: Replay or Exit, rather than the default Fire to Respawn.
Editing DefaultEngineUDK to allow 4096x4096 texture compression This is a method for enabling UDK to use textures larger than its default limit. Conventional wisdom says that game textures should be highly optimized, but large resolution artwork is always enticing for many designers, and computers are getting better all the time. Performance issues aside, it's a good goal to push the graphic envelope and larger textures allow detail to hold up better on close inspection.
Getting ready
We've provided one really large texture that is 4096x4096 that you may find convenient, intended for use as a Skydome. If you are going to use a large texture it would most likely be on a very important model like a key character always close to the camera or else of a very large model which is always visible, such as a Skydome, or Skybox. A simple tutorial for making a Skybox is at Worldofleveldesign.com but this recipe assumes the use of a provided one.
How to do it...
- With UDK closed, open C:\UDK\~\UDKGame\Config\ DefaultEngineUDK.INI.
- Press Ctrl + F in ConTEXT and search for Skybox . You should be directed to line 127: TEXTUREGROUP_Skybox=(MinLODSize=512, MaxLODSize=2048,LODBias=0,MinMagFilter=aniso,MipFilter=point).
- Change the value for MaxLODSize=2048 to 4096. To really force it, you can also set the MinLODSize=4096 too. Doing this for a Skybox is okay, since there's normally only one used in a map, but you'd risk slowing the game down to do this with regular textures. Note, the TEXTUREGROUP_Skybox will allow a texture for a Skybox to be large, but not other things like character textures. For that, you can edit the relevant values in the other TEXTUREGROUP lines. Further down, in the SystemSettingsMobile section, the texture sizes are much smaller, which is due to the relatively limited processing power of mobile devices.
- Now save, and next we'll verify this in fact worked by adding a large sky to a scene in UDK.
- Look in the Content Browser and search the Packt folder for Packt_SkyDome , which is a typical mesh for a sky. You can see there is a completed version, and a copy called Packt_SkyDomeStart which has no material.
- Go to the Packt texture group. You will see there is already a provisioned 4096x4096 texture for Packt_SkyDome , but let's import a fresh one.
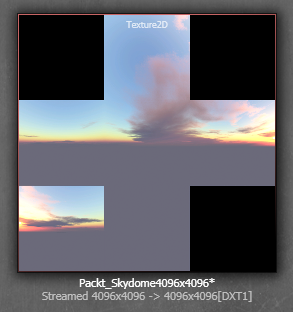
- Right-click in the Content Browser panel and choose Import , and browse to find Packt_SkydomeStart.PNG which is just a copy of the already existing texture. The reason to import it, is to verify you understand the compression setting.
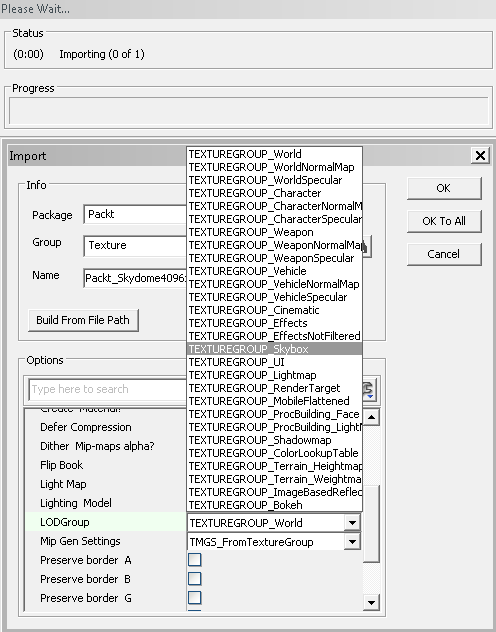
- In the options you will see a panel that lets you specify the name info, which you should enter as Packt.Texture.SkyDomeTest or something unique. Further down you will see the compression settings. Choose LODGroup and from the expanding list choose TEXTUREGROUP_Skybox, as shown in the next screenshot, since this is what we have set to have 4096x4096 compression enabled in the configuration:
- The file may take some time to process, given its size. Once it is complete you can create a new Material Packt.Material.SkyDomeTest_mat. Open it and in the Material Editor hold T and click to add the highlighted SkyDomeTest texture to the Emissive channel. Skies are self lighting, so in the PreviewMaterial node's properties, set the Lighting Model to MLM_Unlit .
- The mesh Packt_SkyDomeStart is already UV mapped to match the texture, and if you double-click on it you can assign the new Material Packt.Material.SkyDomeTest_mat in the LODGroupInfo by expanding until you access the empty Material channel. Select the Material in the Content Browser then use the assign icon [
 ] to assign it.
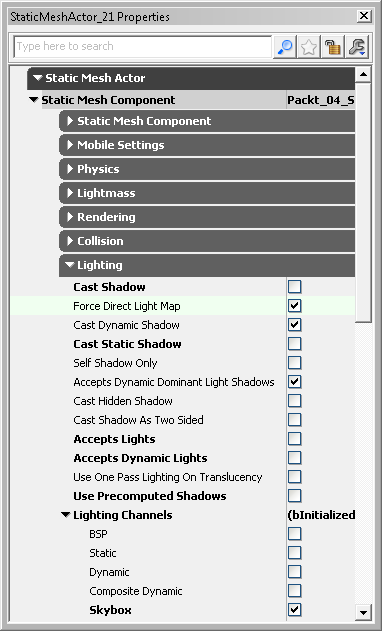
- Then you can save the package and place the mesh in the level. Be sure to access its properties (F4) and under the Lighting turn off Cast Shadow and set the Lighting Channels tick on Skybox and uncheck Static , as shown in the next screenshot:
- You could scale the mesh in the scene to suit, and perhaps drop it down below Z=0 a little. You could also use an Exponential Height Fog to hide the horizon.
- Since there is a specific sun shown in the sky image, you will need to place a Dominant Directional light in the scene and rotate it so its arrow (representing its direction) approximates the direction the sunlight would be coming from. It would be appropriate to tint the light warmly for a sunset.
(For more resources on UDK, see here.)
Setting the preview player size reference object In UDK versions greater than April 2011, pressing the key \ in the editor Perspective view will show a mesh that represents the player height. By default this is just a cube. The mesh to display can be set in the configuration file UDKEditorUserSettings.INI and we'll look at how to adjust this. This is to help designers maintain proper level metrics. You'll be able to gauge how tall and wide to make doors so there's sufficient space for the player to move through without getting stuck.
Getting ready
Back up C:\UDK\~\UDKGame\Config\UDKEditorUserSettings.INI then open it in ConTEXT with UDK closed.
How to do it...
- Press Ctrl + F and search for [EditorPreviewMesh] . Under it, we will change the entry PreviewMeshNames=" EditorMeshes.TexPropCube ". Note the we need to replace this with a StaticMesh, and a good place to put this to ensure loading would be the Engine\Content package EditorMeshes .
- First, open UDK and in the Content Browser search using the type field for TexPropCube .
- When this appears, right-click on the asset and choose Find Package . The packages list will show us Engine\Content\EditorMeshes and in here right-click and choose Import .
- You'll be prompted to browse in Windows, so from the provided content folder, find SkinTail.ASE which is a character model and import this into EditorMeshes. There's no need to set a group name for this. Importing this file as a StaticMesh enables it to be used as a preview model. By contrast, the SkeletalMesh Packt.Mesh.Packt_SkinTail won't work for what we are trying to do. If you set up a SkeletalMesh for the preview model the log will return cannot find staticmesh Yourmodelname whenever you press \ in the editor.
- It is optional, but you can double click the imported StaticMesh and assign a Material to it after expanding the LOD_Info property to show the Material channel. For the SkinTail content, choose Packt.Material.Packt_CharMat .
- Then save the EditorMeshes package including SkinTail and quit UDK.
- Use ConTEXT to edit the file UDKEditorUserSettings.INI so that the line we were looking at in Step 1 is changed to:
- Save, close, and restart UDK. Open a map, and press \ in the editor to see if SkinTail will display. If it doesn't, run UDK using the -log option and check for error warnings when \ is pressed.
- Note that PreviewMeshNames=" EditorMeshes.TexPropCube " can also be adjusted in these configuration files: C:\UDK\~\Engine\Config\BaseEditorUserSettings.INI or C:\UDK\~\UDKGame\Config\DefaultEditorUserSettings.INI.
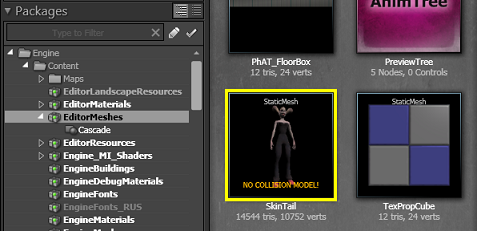
PreviewMeshNames=" EditorMeshes.SkinTail "
Eventually you'll opt to use your own StaticMesh.
Binding a keyboard shortcut to a player action It is relatively easy to reassign an existing action to a different keystroke in the files UDKInput.INI or DefaultInput.INI . It is somewhat harder to create a unique action. In this recipe we will be making the O key toggle a burst of light which lasts as long as you hold the key, then fades back out. I've chosen the letter O just because this key isn't defined by default in the UDK configuration. What this could be used for is triggering a flash light or lantern carried by the player, or illuminating the scene when casting spells.
Getting ready
The scene we'll use has a dark ambiance, Packt_06_KeyChange_Start.UDK .
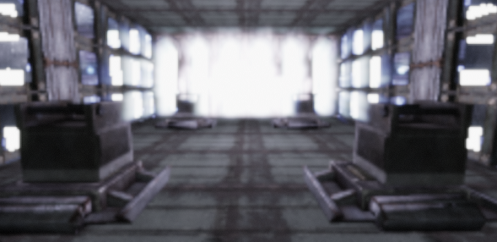
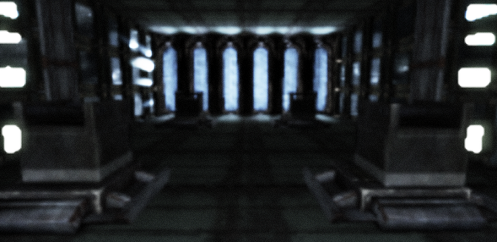 The next screenshot is the result (when we've reached our goal) of flashing a bright light in the room:
How to do it...
The configuration part
- Open the scene if you like and look around, but eventually you should close it, and close UDK, as we need to set configuration with UDK closed.
- Open ConTEXT and choose File | Open and browse for C:\UDK\~\UDKGame\Config\DefaultInput.INI.
- Scroll down to the lines which start with:
- Enter the following line at the top of the list:
- This will give us the ability to fire off a Console Event in Kismet with the Event Name Burst and lets us add an extra layer of functionality. Extend the line:
- Now we can use the release of the O key to fire off a secondary action from another Console Event in Kismet using the Event Name Belay.
- We have to include the segment causeevent because otherwise Burst and Belay would need to be written up as functions in a class somewhere. Since we will only fire off a Kismet event, there's no need to go that far. The downside of using Kismet is that every scene where you want to press O to get Burst needs the console command and corresponding actions defined in Kismet, whereas a class would work in every scene. In a class, you would need to define a function "Burst" by declaring "exec function Burst()" and coding what you want to occur.
- Just to show a little further refinement in this process, let's make Shift + O our desired key. Edit the line so the end has Control=False,Shift=True,Alt=False.
- Save the UDKInput.INI file that we've been editing. Now open up UDK and load Packt_06_KeyChange_Start.UDK and jump into Kismet [
 ]. You may notice that there is some functionality already there for a triggered door and lift. Those don't matter for what we're doing.
;------------------------------------------------------------ ; BINDINGS USED TO ORGANIZE ALL GAME BINDABLE ACTIONS IN ONE PLACE FOR SYSTEMS SUCH AS UI ; GBA - GAME BINDABLE ACTION ; "_Gamepad" - IS USED WHEN A CONTROLLER IS USING AN ALTERED MAPPING FOR AN ACTION ;------------------------------------------------------------
.Bindings=(Name="O",Command=causeevent "Burst")
Bindings=(Name="O",Command= "causeevent Burst | OnRelease causeevent Belay")
Bindings=(Name="O",Command= "causeevent Burst | OnRelease causeevent Belay", Control=False,Shift=True,Alt=False)
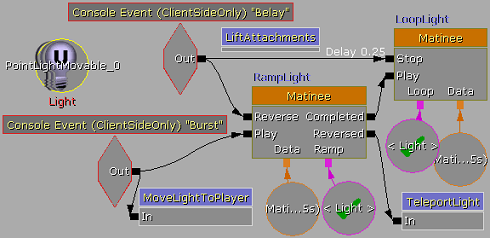
The Kismet part—making the light ramp
- Look at the Object Variable Light for the scene's PointLightMovable actor in the middle of the main room. It is shown highlighted in the above screenshot, along with the network described below.
- What we'll do is place this wherever the player is at the time of pressing a specific key and then turn it on. With the command OnRelease we'll turn it off again. It would be easy to just use the Toggle action but since a ramp is called for then a Matinee ought to be involved to control the light's brightness.
- Select the provided Object Variable Light and choose Select in Level and then press Home to locate the actor. In the main sequence, right-click in Kismet and choose New Matinee .
- Double-click on the Matinee action, then right-click in the dark gray tracks panel under All and choose Add New Empty Group . Name this group Ramp, right-click, and choose Add New Float Property Track .
- From the list, choose PointLightComponent0.Brightness:
- Key the Brightness track so the value ramps up from 0 to 4 over half a second. Zoom out in the Matinee Editor time line and find the red duration marker that is by default at 5.0s. Right-click on this and choose Move to Longest Track Endpoint, so now the time line will have 0.5s.
- Hold C and click to comment the Matinee as RampLight, since we need another. Duplicate the Matinee action, and comment the pasted one as LoopLight.
- For the Matinee LoopLight turn its Looping property on, then replace the value of its Brightness track 0.0s key so it has a steady curve of 4.0.
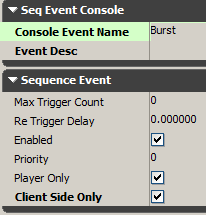
- In Kismet, right-click and choose New Event | Console Event. Be sure to turn on its Client Side Only property. For the property Console Event Name type Burst. This is what our key binding in the configuration file calls up:
- Hook up the Out nub of the Console Event Burst to the Play nub of the Matinee Ramp. Also extend a wire from the same Out nub to the In nub of the existing Sub-sequence MoveLightToPlayer , which handles placing the light actor and its attachment so it follows the player.
- In Kismet, right-click and choose New Event | Misc | Console Event. Be sure to turn on its Client Side Only property. For the property Console Event Name type Belay. This will drive our OnRelease action.
- Hook up the Out nub of the Console Event Belay to the Reverse nub of the Matinee Ramp. From the Reversed output of the Matinee Ramp extend a wire to the In nub of the existing Sub-sequence TeleportLight , which handles placing the light actor out of the way when it is not in use. This is probably optional.
- From the Completed output of the Matinee Ramp extend a wire to the Play nub of the Matinee LoopLight. Extend an additional wire from the Out nub of the Console Event Belay to the Stop nub of the Matinee LoopLight. Right-click on the Stop nub, choose Set Activate Delay , and enter 0.25 for this.
- In the editor, press Build All [
 ], then after it is ready, click on the Play on PC mode icon [
 ] and run around a bit; then press Shift + O to check the light works. Hold it down then release to see if the OnRelease works.
 - You can load the provided map Packt_06_KeyChange_DEMO.UDK to check the completed result. Pressing O in this dark map will allow you to create a light which ramps up over 0.5s to be very bright. It will stay on as long as you hold the O key, as you move or look around. When you release, the same Matinee that ramps the light up will reverse again. Remember that what we've done here is set in Kismet a Console Event that fires actions specific to this map, so in another case the same O key that causes Burst could be used in a Console Event Burst that causes something else to occur, such as a burst mode for a weapon, or a burst of song, or a burst of speed. Burst itself is just a name allowing us to tie a keyboard key to an event.


Adjusting player speed A good place to start getting to know the internal variables for the player is the web page Wiki.beyondunreal.com.
This page doesn't show you how to change values at our disposal but it can help elucidate ways a pawn can work.
One important variable to set for characters is how fast they move, particularly if their speed has to vary in different situations. This is what we'll deal with in this recipe, by creating a hotkey controlled sprint capacity for our player pawn class.
Getting ready
Open the file Packt_06_Sprint_Start.UDK and note the PlayerStart is within a long passage. We have to run really fast to clear a sinking door, and if we don't we're fried. One way to adjust player speed is through an edit to the MyPawn.UC class, so open this in ConTEXT: C:\UDK\~\Development\Src\MyGame\Classes\MyPawn.UC.
You can also set a key for the player speed in Kismet using a New Action | Misc | Console Command action with a command entered such as: setbind R setspeed 0.5 where R is the key and 0.5 is a multiplier on the default speed. The above Console Command will reduce walking speed by half when R is pressed. You can fire the action by hooking it up to a Level Loaded event or a Trigger event.
How to do it...
- In order for any changes we make to our pawn class to work, if you haven't already done so, set in the DefaultProperties in the last few lines of this file: C:\UDK\~\Development\Src\MyGame\Classes\MyGame.UC.
- To be fair, there is more than one way to control player speed. To start with let's look at one way that can be achieved if you enable an existing chunk of code found in Pawn.UC. MyPawn.UC, which is provided in this book, extends from UTPawn.UC which itself extends from Pawn.UC , so there's a lineage at work here that is handed down even though UTPawn.UC doesn't itself declare SetWalking or a function using it. This is what we'll do now for MyPawn.UC :
- The line super(Pawn) signifies that SetWalking comes from Pawn.UC . You then need only to specify in the DefaultProperties section of MyPawn.UC the following lines:
- The left Shift key is already set by UDK for togging running and walking, based on this method.
- Of course, just changing the speed doesn't automatically make the character's animation adapt to the change. This must be provisioned in the AnimTree used by the character, which can fire animation sequences using BlendBySpeed nodes. What you'll see if you PIE is just the same walk cycle but with less forward progress when you hold Shift to slow down.
- Now, a more direct way to set the walk or run toggle works as follows. In MyPawn.UC add the following lines above the DefaultProperties section, where functions should go:
- How this works is that when you press a Sprint hotkey an additional speed of 1000 (or whatever you set) is added to the default Groundspeed value, set in DefaultProperties of MyPawn.UC and what it is advised to do is set the hotkey's OnRelease part to be a NoSprint command, which takes off the added 1000 again, thereby resetting GroundSpeed . Make sure the values you set are the same for adding to Sprint and subtracting in the case of NoSprint .
- Save MyPawn.UC and to complete this method, open the file C:\UDK\~\UDKGame\Config\DefaultInput.INI in ConTEXT. Scroll down to find the binding info below:
- Add the following lines directly after the previous lines (noting the . at the start):
- Actually the F key is already assigned to FeignDeath (a play-dead action which is not really very useful), so scroll further down and use ; to comment out the following line:
- Open the provided scene Packt_06_Sprint_DEMO.UDK, which is already complete. In the menu View | World Properties, make sure that the Game Type for PIE is set to MyGame. This will ensure our code from MyPawn.UC is used for this scene. We'll just test out the speed during PIE in order to see if holding the Left-Shift key will make us walk and holding the F key will make us sprint.
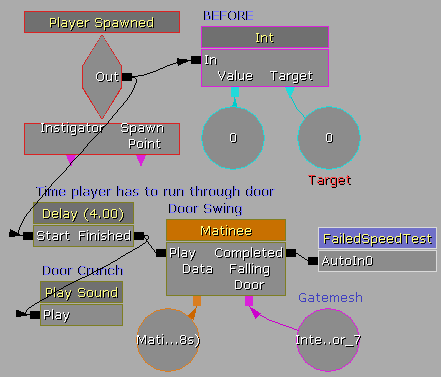
- Don't forget to check the Kismet for the scene to see how the conditions and effects were set up for whether or not the player made it through the gateway. In the image below we see an Integer Variable named Target which is set after the player spawns. After a four second Delay, a Matinee locks a Gatemesh near the exit. The player has to rush there before they are trapped.
- You may wonder why we don't just use a New Event | Key/Mouse Input to control speed. That would be fine for a change effected only in the current map, but one class setting can effect all the maps in the game.
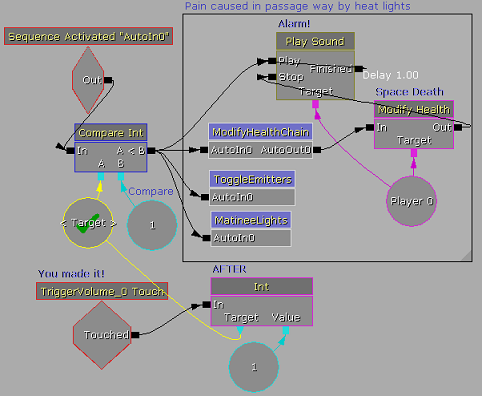
- The properties that drive the highlighted PostProcessVolume change are shown in the Sub-sequence FailedSpeedTest in the next screenshot, which compares Target using a Compare Int condition:
DefaultProperties { PlayerControllerClass=class'MyGame.MyPlayerController' DefaultPawnClass=class'MyGame.MyPawn' }
event SetWalking(bool bNewIsWalking) { super(Pawn).SetWalking(bNewIsWalking); }
Groundspeed=500 //this number defines the maximum run speed. WalkingPct=0.1 //between 0.0 and 1.0, since it is a percentage.
exec function Sprint() { GroundSpeed = speed+1000; // for 1000 set a value to suit } exec simulated function NoSprint() { GroundSpeed = speed-1000; // here the value is annulled }
;-------------------------------------------------------------- ; BINDINGS USED TO ORGANIZE ALL GAME BINDABLE ACTIONS IN ONE PLACE FOR SYSTEMS SUCH AS UI ; GBA - GAME BINDABLE ACTION ; "_Gamepad" - IS USED WHEN A CONTROLLER IS USING AN ALTERED MAPPING FOR AN ACTION ;--------------------------------------------------------------
.Bindings=(Name="F", Command="Sprint | OnRelease NoSprint")
.Bindings=(Name="F",Command="GBA_FeignDeath")
There's more...
Setting variable speed animations in the AnimTree
Changing speed internally, within the character itself, is useful when creating combat dynamics or variability that might come from input other than the player like falling speed increases based on increases in distance.
- Open the animation tree Packt_CharTree_Aim , a partially complete asset (for the completed version we're using Packt.Mesh.Packt_SkinTailFBX for the SkeletalMesh and Packt.Anims.Packt_CharTree for the AnimTree).
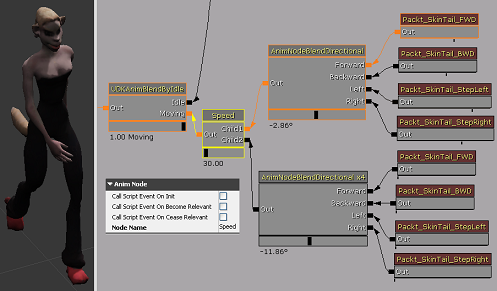
- Add a New Animation Node/BlendBy/AnimNodeBlendBySpeed and in its properties expand the Anim Node part and type Speed in the Node name field. This name will appear on the header of the node. Also tick On the property Anim Node Blend List | Play Active Child.
- Hook up the existing AnimNodeBlendDirectional which drives the directional animation sequences from the AnimSet into Child 1 of the Speed, and hook up Speed's Out into the next node in the chain, in this case the Moving output of the UDKAnimBlendByIdle.
- Right-click on Speed and choose Add Input.
- Select the AnimNodeBlendDirectional node and the four clips joined to it. Press Ctrl + C and Ctrl + V to reproduce them, and hook the copy into the newly added Child 2 input of Speed .
- For each clip joined to the pasted AnimNodeBlendDirectional set the speed to 4.0 (and make sure the first set of clips is set to 1.0) in their property Rate.
See also
There is a similar guide to setting up a player sprint control at 'UDK Central' and it includes functionality for a brief slowing down effect after sprinting, available at: Udkc.info.
Unreal Development Kit Game Design Cookbook
 Over 100 recipes to accelerate the process of learning game design with UDK book and ebook. (For more resources on UDK, see here.)


can't see it anymore at the reactor!
This game is free and will probably stay that way.
no fischkopf, it's one of the free to play ijji games on beta. however they are making commercial profit on this game (cash shop items, prepaid cards, etc.)
is this game free?
I don't think so, there would be comming a beta soon
They had that closed beta last DEC so we can only hope it comes out fairly soon, at least as an open beta.
this game is dead?
it would be great!
its kinda unreal tournament gameplay that i watched
fallout kinda?