
An "Anti" is a visgroup that is used to spawn entities to show that the objective string associated with it was not selected by the game that round. An "Anti" is very simple to make and can be created easily with the following steps.NOTE: It is suggested that you read [[Objectives Setup]] before attempting to make this.
Keep in mind that Anti should only be used if there is '''more''' than one objective string in your map. If there is only one objective string to follow, Anti cannot and will not spawn in your map.
1. To setup an Anti it is advised that you finish making '''all''' of your objectives first. (See [[Objectives Setup]]) Once you are done it should look similar to this I42.tinypic.com
2. Now it is time to make the Anti. In the map [[nmo_broadway]] the Anti is used perfectly in the objective chain for the motel. When you are in the objective chain for the motel, the Cinema's doors are boarded up. This is what Anti's are mainly for. In my map I wanted to show that when you are on the "Truck" objective, you do not have access to the underground facility area. I39.tinypic.com
3. Create a VisGroup with the exact same name as the objective you are "blocking off". For me the objective I am showing that is not active is called "open_door", so I created another VisGroup called "open_door" with the wood barricades I made.
4. Look at your VisGroup box located on the left of the screen (You should know where this is by now) and click the edit button.
5. The "Edit VisGroups" menu now should have popped up. Click the "New Group" button at the bottom left corner and type in the name "anti". Close the box and you should now have a new empty VisGroup. I42.tinypic.com
6. Select the anti objective you created earlier in step 3 and right-click drag it onto anti.
7. the anti objective you made earlier should now be a child of the parent visgroup anti.
8. Congratulations! You are now done in Hammer working on your Objectives. The next steps are outside of Hammer.'''NOTE''': These next steps show you what to do with '''ALL''' of your objectives with the NMRObjective tool.
9. Inside the utils folder in the NMRiH build you will find NMRObjective.exe. Run this. The first time you start up, it will ask you for the location of your NMRiH maps directory (where the BSPs are stored). This tool will be used to link your objectives to one another.https://i12.photobucket.com/albums/a225/ssba/nmrih/obj_tool1.png
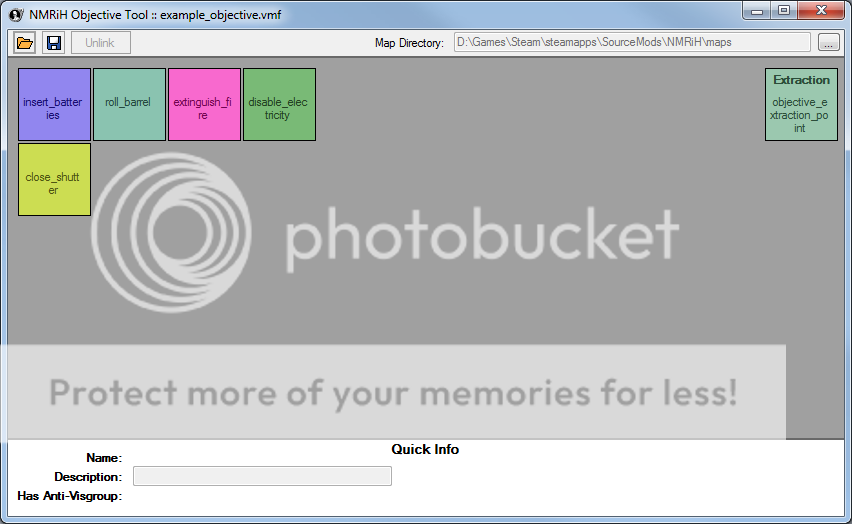
10. Click on the folder icon to open your VMF. A couple of coloured blocks will appear on the screen, corresponding to your objectives, anti's and extraction points.(Objectives and Extraction Points. I12.photobucket.com )
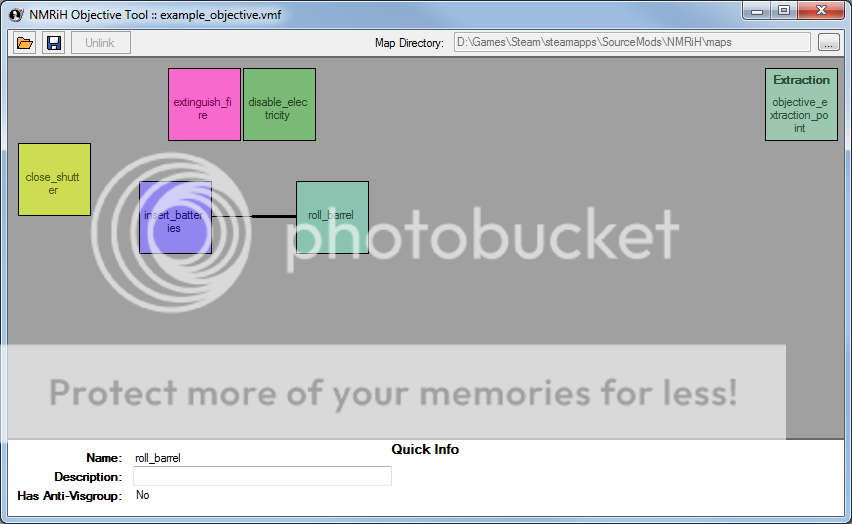
11. Click and drag these blocks around to position them in a logical layout (position is only cosmetic and has no effect on the game). To select multiple objectives, hold CTRL. In order to link one objective to the next, RIGHT CLICK on an objective, DRAG the mouse to the next objective, and release. In order to unlink two objectives, select them both using CTRL and click the 'Unlink' button.(Two linked objectives. Line thickness signifies direction. Thin -> Thick : First -> Second. I12.photobucket.com )
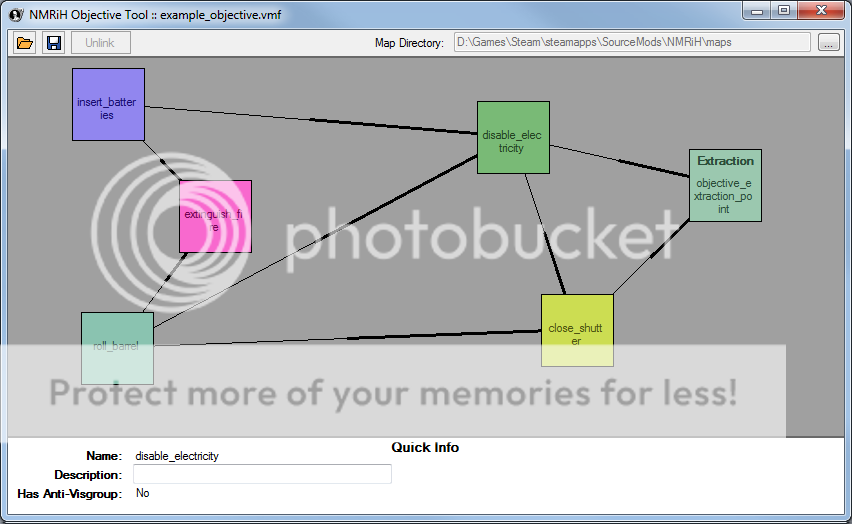
12. Continue doing this until you have your objectives linked however you like. Keep in mind that extraction zones are the end of the round -- they will not continue on to other objectives.(Fully linked objectives. I12.photobucket.com )
13. You can name each objective by clicking on its block and filling in the "Description" field on the bottom of the screen.
14. All objectives that do not have a link leading into them will be considered as the starting objective for each round. In the example above, insert_batteries and roll_barrel are candidates for starting objectives. Round will finish after extraction or the final objective in a chain if it does not lead anywhere.
15. When you are all finished, click the Save button. This will save a .NMO file in your maps directory, as well as a .NMOS file in the same directory as your VMF. The .NMOS file will preserve your layout the next time you open that VMF in the objective tool.
16. You are all set! The next time you load up your map in NMRiH, you should be able to play your new objectives with Anti's.You can now pat yourself on the back. (If it worked of course!) You've followed 16 steps that can seem overwhelming at first, but you will get used to them eventually and then be able to created Anti's on your own!
An example .vmf is located here: Dl.dropbox.com this includes some already compiled objectives, anti's, and some zombie spawns.


