Right back at the beginning, when we originally conceiving Forest of Suns, we came to the conclusion that whatever we had to learn to get the game going, we would share. So in the coming months I will be sharing some more technical based posts, ones that may give some developers a clue of how we've gone about making the game, in the hopes of making our experiences useful to other indie game developers. Approaching this game as an artist has been a challenging experience and the game development aspect has been a worthy adversary. The biggest challenge I've had is balancing the art production with the technical process of importing the artwork into Unity ready for game making.
Coming from a print background and understanding resolution has made me fanatical about getting the resolution right for the ever expanding array of screen sizes, especially apple's "Retina" display, a fiasco in it's own right. But finally after many months of importing many different sized images into unity and running a myriad of tests, I think it's finally coming together.
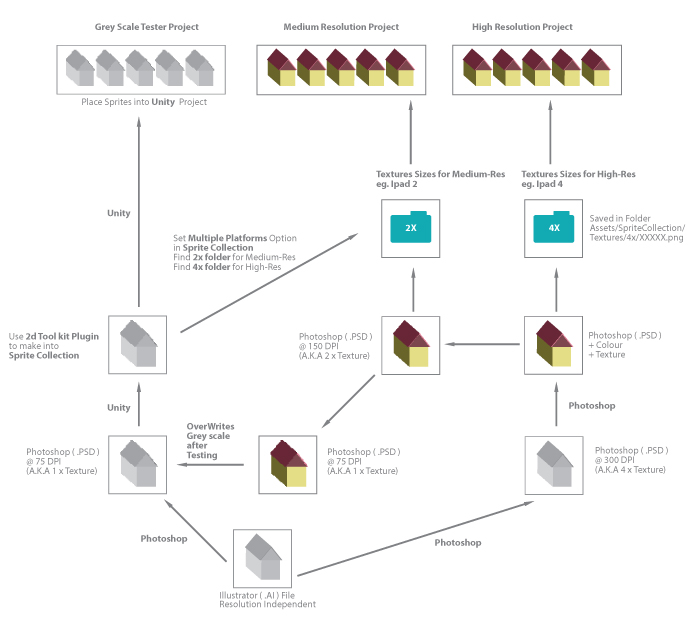
Below is an image of how diagrammatically, I am implementing the background art style workflow. Two big key factors have been separating resolution based art into different folders and the amazing 2D toolkit plugin for unity.
Illustrator
The essential workflow starts with Illustrator. All the environments and elements are built in illustrator as objects. Illustrator is excellent for creating perfect geometry, and considering the whole program is vector based, it's completely resolution independent.The assets (by assets I mean artwork) are created in grey scale to suggest volume and space. These grey scale objects create a clear indication of the environment in which the character will work through without the necessity of details. Essentially the basic building blocks of the game. Illustrator allows the user to export at any resolution so it's great for setting up separate resolutions for different devices. The above diagram explains this in detail.
Photoshop
After the low resolution greyscale art style is set up and working, the assets are taken into photoshop and colour and texture are added.The layers that are exported from illustrator will stay intact in photoshop allowing me to add the textures to certain parts of the broken up element. This is where all the glitter and glue comes in to really make the art style pop. Once this is done. The assets are saved at separate resolutions starting at the highest 300dpi and then compressed at 150dpi and 72 dpi. Once done the art style is ready for unity.
Tune in to the next post where I'll explain how the 2D toolkit plugin references the two separate resolution folders...