Icons ABC
postcontent wrote:Rating: Newbie to Rookie
You will need: the Mod Tools, specifically the Mod Packager and a commercial graphics tool such as Photoshop or the Gimp. This tutorial will be using Photoshop CS as that is what I use. Apoligies if you use the Gimp but you should be able to translate the instructions without too much difficulty, please do not ask me how it is done in Gimp and do not ask me how you do it in a different version of Photoshop because I don't know.
Tech Specs
Common Myth: they must be TGA. WRONG - they can be JPG, TGA or DDS.
Common Myth: they must be 64 x 64 pixels. WRONG - they can be ANY size and ANY proportions, they will be squashed to fit into the UI.
Common Myth: they must have an alpha channel. WRONG - JPGs don't have alpha channels for start and also various Relic Tau icons don't have alpha channels even though they are TGAs. (more on alphas later) It's definitely best to use alpha channels though, as this makes your icons blend in much better and your mod will look more professional overall.
I've even tried just banging in a couple of unchanged screenshots (renamed them only) to see if they work and they do (1200 x 1024 JPG).
However, it's best to work in TGA format and use alpha channels. I tend to stick with 64x64 but thinking about the icons you see for a selected squad look kinda fuzzy, so maybe it would be better to work with 96x96 or even 128x128 for more detail.
Extracting Source Material
You'll need to refer to the Relic icons from time to time and it's much easier to copy various bits off them than make your own. Extract the Dark Crusade/DXP2/dxp2data.sga and Dark Crusade/w40k/w40kdata.sga to a safe place using the ModPackager . In those extractions the icons are kept in art/ui/ingame for colour ones and art/ui/ingame_disabled for the greyed out ones (same for both extractions). Each race has its own folder of icons (as do the other kinds of icons) and each icon comes in a pair: one full colour and one greyed out for disabled. The greyed out effect is not automatic and so you have to make your own version, but this also means you can put anything as the disabled icon too. Famliarise yourself with the structure and open some up and have a look.
The w40k has most of the SM, Chaos, Eldar and Ork ones but there are more in the DXP2 set and many icons are superceded in this set. The w40k are the original vanilla dawn of war icons, so look in the DXP2 set for it first, then check the w40k one.
note: you won't be able to see thumbnails of these as they are tga format.
The Enabled Icon
Okay, we're going to make a research icon for something made up. It doesn't matter what for, I've seen a screenshot I took and I think it might make a cool icon.
Photoshop tips:
CTRL + Z = undo.
CTRL + ALT + Z = history undo (allows you go back further than one step).
CTRL + + = Zoom in.
CTRL + - = Zoom out.
Holding down on most of the tool buttons will bring up more tools.
New layer = CTRL + SHIFT + N or Layer -> New -> Layer.
Make sure the layer you want to edit is selected - it's very easy to edit the wrong layer.
Moderation - don't go overboard with the effects otherwise they will look gaudy and oversaturated.
Grabbing a border
1. Create a new file (File -> New). 64x64, full colour, PSD document (remember to pay attention to what file format you are saving it as).
2. Open up a research icon from the extracted archives, preferably from the same race that you are making an icon for because there's subtle differences and the devil is the detail. We're going to pinch a couple of things from it. It's best to use Relic borders as this keeps things consistent. It's wise to keep a stack of these standard things stashed somewhere so you don't have to redo it everytime. Now, we could just edit this icon, it would save us a bit of work, but in the interests of education I want you to do it the proper way for now and start from a scratch blank file.
3. Copy the colour image onto the your new file. CTRL + A will select all, CTRL + C will copy it and CTRL + V will paste the copy onto your image. Leave the Relic icon open for now. You now have 2 layers. Layers are pretty simple really. They stack up in a very intuitive way. You can drag them around and re-arrange them using them Layer window (Window -> Layers if it's not up already) but at the moment the bottom layer will be locked so you can't.
4. Add a layer mask onto the picture layer - select the layer, Layer -> Add Layer Mask -> Reveal All.
5. Using a black paintbrush paint onto the layer mask. To make sure you are painting onto the mask and not the image click the little minipic of the mask that will have appeared on your colour layer (clicking on the layer will default to the actual image). You may want to zoom to make sure this is accurate. What you are trying to do is keep the yellow research border but make the rest of the image disappear. The layer mask sits on top of the image layer it's linked to and bits that are black on the layer mask will disappear, but white bits will still be shown. In this case, because the layer underneath is white, the invisible bits will look white.
If you mess up, you can simply get your white paintbrush out and paint over the black bit: masking is much more flexible that using the Eraser tool as you can undo mistakes very easily be simply repainting in white and having another go. I'll say it again though - make sure you are paiting onto the mask and not the image!!
Use this tool to swop between black and white. The mask will take greys, but it will not take colours. You can also blur the mask layer etc. and do all kinds of stuff to it.
6. When you are happy, right click on the mask minipic in the layer window and and click Apply Layer Mask to make it final. If you're not that happy with it you can actually leave it there without ever applying it. You can also right click to Disable and/or Discard your mask too.
You should see this now.
Alpha Channel
You need to borrow the alpha channel too now. The alpha channel works like the layer mask, except that it applies to the WHOLE image and also you don't see it effects while you are editing, you only see them in game after you have saved it to TGA. Again, black will be hidden and white will be visible.
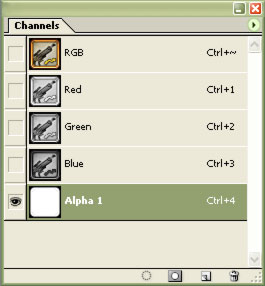
1. Open the Channels Window - Window -> Channels This is the channels, there should be 4 to begin with.
2. Go back to the Relic icon and select the alpha channel in the Channels window - this will make the only the alpha channel display. Copy the whole channel to the clipboard(CTRL + A, CTRL + C).
3. Go to the Channel window on your icon and add a new alpha channel (leave the name alone). The button for this is at the bottom of the channel window and is the 2nd one in on the right, the little page turny square thing next to the dustbin. The new channel will be all black.
3. Paste the Relic alpha channel onto your one using CTRL + V.
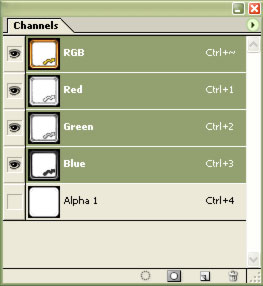
4. Click back onto the RGB layer at the top to go back to normal.
5. If you click the little eyes next to each channel so that they are all lit up you will see red on your image. The red bits are the bits which will be hidden. This is the closest you can get to seeing what it will look in game.
The Icon Image
1. Take a screenshot of the game , grab something off the web, whatever. Get an image that has something in it the will make your icon. The Printscreen button will take a picture of whatever's on the screen and save it to clipboard, press CTRL + V to paste it into an open photoshop file. Screenshots taken in game are automatically save to Dark Crusade/Screenshots so you can take a load and then look at them later, but otherwise, you'll only have one at a time on the clipboard.
2. Open the picture in Photoshop or paste it into a blank Photoshop document. Use the dotted square tool (top left of tools bar) to select the area you want.
3. Copy it to clipboard
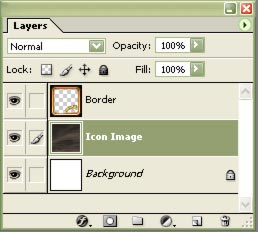
4. Paste it onto your icon. It will create a new layer.
5. Drag the layer beneath the border using the layers window.
6. Make your image look snazzy. This is the fun bit. Here's several simple tools and techniques to use just to get you started:
Transform
Select the layer and press CTRL + T or use Edit -> Free Transform
Use this to re-size your image to the right size and move it around. Use the little drag handles in the corner and hold shift while dragging if you want to keep the proportions the same. It doesn't matter if your layer goes over the edges, they'll just get cut off when yousave to a file format.
Brightness/Contrast
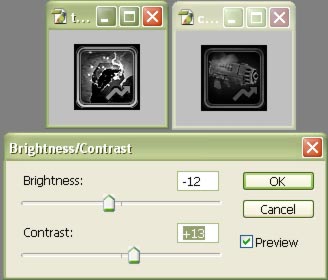
Select the layer and use Image -> Adjustments -> Brigthness/Contrast
Ususally reducing the brightness a little bit and turning up the contrast is a solid thing to do. It's a very textbook maneuver and really a little too textbook for some people, but we're not making fine art here, we're making icons so just do it!
Polygon Lasso
Hold down left-click on the dotted square/dotted oval button on the toolbar to get this one.
This is good for chopping out weapons to use on weapon icons and things like that. Basically, it's join the dots. If you want to cancel a dot you've made press the Delete key (took a while to find that one out!). Once you've snagged the bit you want copy it and paste it on top and keep the full picture in case you need it later. Make the old layer disappear by clicking the little eye on the left of the layer window.
Paint Bucket
Hold down left-click on the the gradient tool to get this one.
I think everyone knows about this one. To unlock the Background layer at the bottom double click it and give it a name. You can now paint it. You'll need to paint your background if you chop out an image above.
Masks
Same as above, you can have these on each layer so don't be afraid of using them. Bear in mind also that you don't need to Apply them, you can just leave them there. Also, if you blur the mask itself (the filter menu) it can get rid of nasty obvious edges to the mask and make the images blend better. It's good practice to be organised in your photoshop documents and to keep the source material as there's no need to get rid of it - when you save to the final format none of the hidden images will be in there.
Right click on the Icon Image and duplicate layer. With two identical images you can have some fun. Mess around with one of them below, then use a mask on the one on top and gradually let bits through. EG - you can make some laser stuff really bright by making the whole bottom layer really bright and then letting only the lasers show through to the top.
Hue/Saturation
Select the layer and use Image -> Adjustments ->Hue/Saturation
Turning the saturation up is again pretty textbook but can work wonders, same as removing some, a little greying can make it look more realistic. Hue is good for simpy changing the colour of stuff, mainly single colour stuff. Colorise can be useful too, but is a bit novice really.
Color Balance
Image -> Adjustments -> Color Balance
This is a better tool to use to colorise seomthing. Does what it says on the tin really, just play about with it.
Blur and Sharpen Edges
Filter -> Blur -> pick a blur
Filter -> Sharpen -> Sharpen Edges
Blur is good for getting rid of that pixellated look you can sometimes get and also good for getting rid of those sharp jagged lines on 3D models. Use the blur tool for that as well (the water droplet on the toolbar) if you want to go over only the edges by hand. If you then sharpen the edges afterwards it gets rid of that blurry look overall without getting the pixellation back.
Blending Options
Right click on the layer you want and then select blending options. There's a whole host of stuff to play with. Try putting a subtle drop shadow on the research border. Too much will look silly, so just a little bit, maybe ony 20% opacity or less.
This is my finished icon, it's a heavy bolter getting hit my a plasma gun, just a screen grab from ingame, I thought the FX looked cool.
Saving
Okay, when you are happy you need to save it. Save it as a PSD first -don't flatten down the layers, do do anything final as you don't need to, just save it as a PSD workfile. Then File -> Save As... and choose Targa (.tga) as the file type instead and give it a proper name. You'll need to recreate the folder structure that is in the extraction in your own data folder, so you'll need to make those extra folders before you save. Save it straight into your folder tree in your mod folder (yourmod/data/art/ui/ingame/yourrace_icons/this_icon). The name can be anything really, it doesn't matter. Choose 32-bit resolution when it prompts you. You can choose 24-bit but you may as well set the standard high with 32. Don't check the Compress(RLE) box, leave it uncompressed otherwise you'll get a pink box. (ta - WarpObscura for that).
The Disabled Image
Right, now you need to make the other part of the pair. This is easy though, you've done the hard bit.
1. Go open up a disabled icon from the same race that you're making one for. You want to compare yours to a Relic one to make sure it fits in and doesn't look rubbish so pick one that it might sit next in the game. Also you'll need to pinch the alpha channel again.
2. Open up the tga you just saved (not the psd, the tga).
3. Desaturate your icon you just made earlier (unless it's for Orks - ork icons till have some colour in them!). Image -> Adjustments -> Desaturate (you don't need to unlock the layer to do this)
4. Play with the Brigtness/Contrast tool (see above) till it looks right. You'll generally have to turn both down to get it.
5. Steal the alpha channel of the disabled icon and replace the one on yours using the same technique as before, except this time you don't need to make a new channel, just paste straight over. Now, you might not need to do this step, but some races have semi-transparent disabled icons eg Eldar (the alpha channel is mainly grey). Not all races are like this, which is why I asked you to pick an icon from the same race as yours, some you can get away with leaving the normal alpha channel on there.
6. Save it to Targa again using Save As, don't Save it as you'll overwrite your full colour icon, just Save As. Save As into data/art/ui/ingame_disabled/yourrace_icons and use exactly the same name as the full colour one otherwise the disabled icon won't work.
Linking it in the AE
The icons are almost always link in the UI section of the file, either ui_ext of ui_info or something like that. When you link it you must include the race folder too, but that's all - so "space_marine_icons/lightning_upgrade" (that's the name of the icon I'm working on). You don't need to include the file extension either.
Weapons upgrade icon go on the actual weapon file, not the squad.
-Leader icons go on the leaders entity file.
-Squad icons only really need to go on the squad file, but put them on the entity file for the basic trooper too
-Research, buildings, abilities and addons are all pretty obvious.
-Some things have their icon set outside of the AE, the special ability extensions like Nightmare Shroud. They are set elsewhere and are for another tutorial. I can think of no justification as to why they are set elsewhere though, it's just one of Relic's quirks.
You can change the position of the icon by editing the ui_index_hint field to a different number. The positions are laid out like this:
1.2.3.4
5.6.7.8
9.10.11.12
Except for abilites, which are laid out like this:
*.*.*.*
5.6.*.*
1.2.3.4
When squads upgrade weapons their border changes colours right? This is done by using several icons, each with the different border colours. Simply create these bordering icons and name with "same_name_as_base_icon__weapon_upgrade_file_name". So that's the original icon name, followed by the weapon they are upgrading to (the proper weapon lua file name) separated by 2 underscores. Take a look in the icon archives if you are under any confusion. If you don't put these icons in they will turn pink when the squad upgrades.
And you're done. One icon.