
Welcome back! This fourth, and long awaited tutorial starts moving out of the basics and into some of the more curious and more specific parts of programming for Unreal Tournament 3.
Today, we're going to create a special object that we're going to call a Power Cube. To go with our Power Cube, we're later going to create a weapon called the Charge Rifle and a second weapon called a Grabber.
The Power Cube is going to be a special object - in a future tutorial, we will use it to create a new game mode. The Power Cube is a simple physics actor with some additional properties - it can change colour and change material in the game! This means it can both look and behave differently depending on what the player does to it.
The Charge Rifle will be responsible for making the Power Cube change. It's primary fire will make the Power Cube change colour, and it's secondary fire will make it change material. We will have a neutral coloured Power Cube, as well as a red and blue one, and we'll be able to make it either heavy and slippery, or light and bouncy.
The Grabber will be able to pick up the Power Cube so that the player can move it around. It will also allow the player to rotate it and push it away or pull it towards them.
The Power Cube
First things first, we're going to need to create that Power Cube! In order to create a Power Cube, we're going to copy an existing static mesh and create some new materials that we can use with it. Fire up UnrealEd like we learnt to in Unreal Learning #2: UT3 Configureable Mutators.
We need a mesh, so let's go into the generic browser and start looking for something useful. We want a static mesh that is suitably cube-like. Ah, how about NodeBuddy__BASE_SHORT tucked away in the package NodeBuddies? That looks like a good mesh to try. If you back click on it, you'll find however that you can't do anything with it. Rubbish! Epic have locked you out of the packages. Guess you'll have to create your own mesh right?
Wrong! We can get around it with a bit of cunning and insider know-how on how UnrealEd works. Back click on the NodeBuddies package on the left hand side and fully load it. Take note of the name of the package, and head into the 'logs' tab up top. In the text bar at the bottom, we're going to type "obj savepackage file=NodeBuddiesCopy package=NodeBuddies" (without the quotes) and hit enter. This caches the package information in a copy called NodeBuddiesCopy, and means that when it is done, we can now access that package file, so let's go back into the 'generic' tab and find our mesh. We can now back-click on it and duplicate it into a new package. I called the mesh PowerCube and the package TutorialStuff.
We have a cube! Now we need a new material, one that we can recolour neutral, red and blue, and one that we can make hard or bouncy. This could prove interesting! Back click on the main window of the generic browser and create a new material. I called it PowerCubeBase.
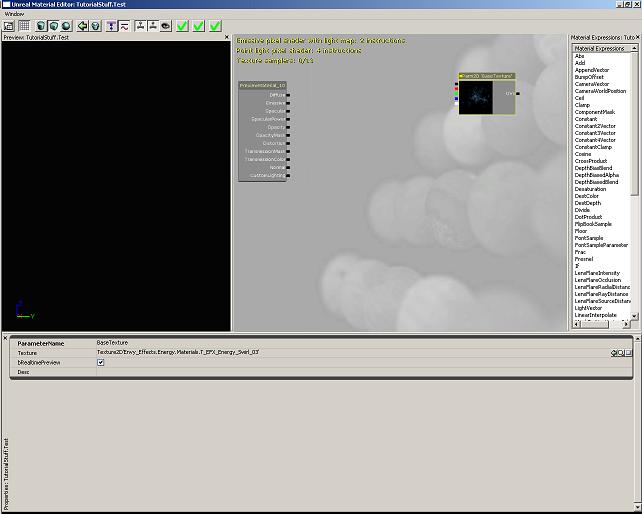
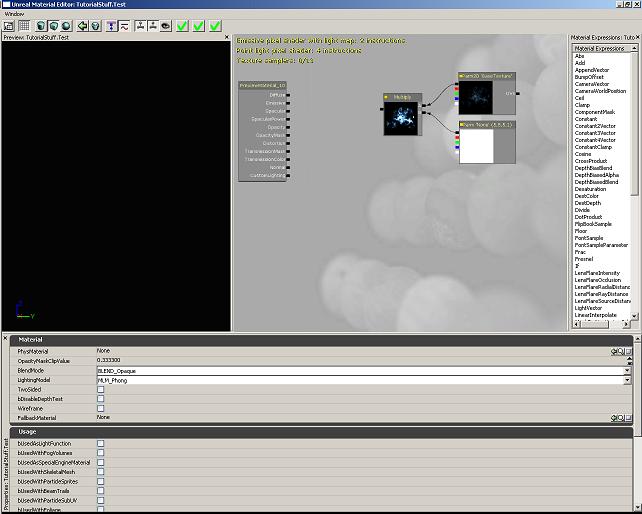
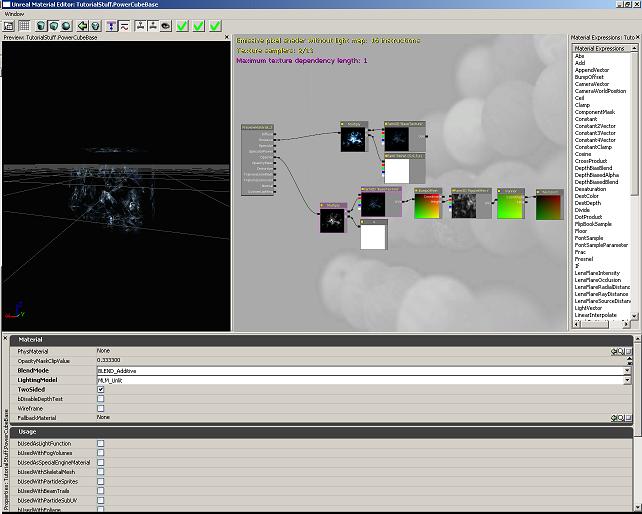
First thing we're going to do is make sure our material is set up properly. Click on the PreviewMaterial_0 box and look at the properties of it listed below. We're going to make a few changes. First things first, we're going to set the blend mode from Opaque to Additive. This will change the way our material behaves - it won't be solid and opaque, it will instead act as a glow. We will also change the lighting model from Phong to Unlit - we don't want any fancy lighting, we just want a simple power cube. I also made my material two sided.
Now to start creating our material. I started by back clicking on the grey design window and creating a new TextureSampleParameter2D. Clicking on this brings up its properties. I called it BaseTexture and found a material for it in the generic browser. I picked T_EFX_Energy_Swirl_03 that I found in the Envy_Effects package, in the sub folder called Energy.Materials, because it looked like it could get a good swirling or rippling effect going.

Underneath that, I back clicked again and created a new VectorParameter, then changed its values to 5,5,5,1. On the right of those, create a new multiply. We're going to multiply the each of the red, blue and green channels of our texture sample by 5. This will make it appear much brighter. To make the multiply work, we need to simply connect the boxes. Click on the black square on the left of the texture sample, and drag and connect it to the top square on the multiply box. Then we connect the black square on the vector parameter to the bottom square on the multiply.
Nothing there yet? Well, if you look in the properties of the multiply expression, we can find a value called bRealTimePreview -check this box and you can see what effect it has. In fact you can check this box for every expression you have, including your texture sample and vector parameter. This helps you see exactly what everything is doing. You can also look at the actual expression boxes, and click on and off the little yellow button to check and uncheck this if you wish.
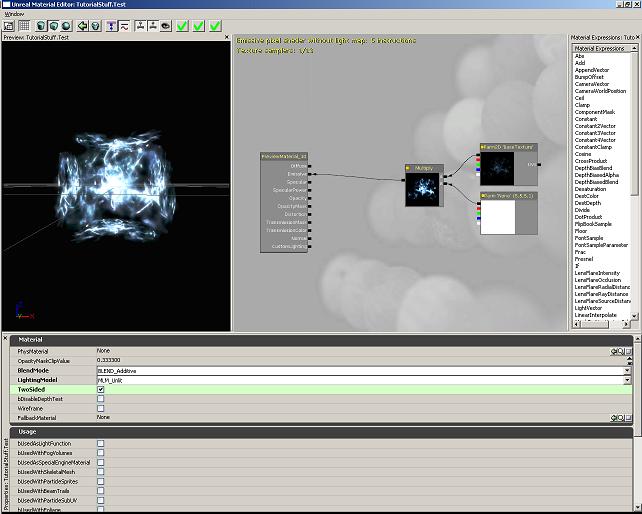
Last but not least, let's connect this all up to our preview material. Connect the left hand box on the multiply expression to the emissive box on PreviewMaterial_0. Aha! We can see something! But whilst it looks quite interesting, it'll obviously look rubbish in game. Let's make it ripple and move!
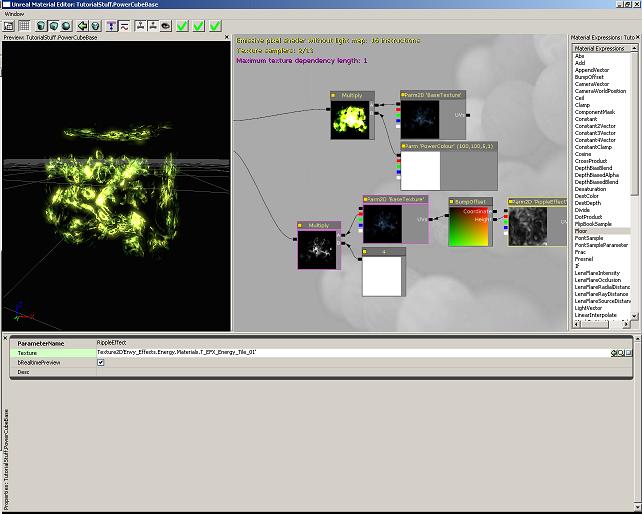
In order to make it move, we're going to need to modify the UVs (the texture coordinates) in real time. We do this using a special expression called a panner. Underneath our vector parameter, we're going to create a TextureCoordinate. I gave it the values 0.5 and 0.5. On the left of that, I created a Panner with a SpeedX of 0.1, and a SpeedY of 0.05, then connected the texture coordinates to the coordinate square on the panner. Next to our panner, let's create another TextureParameter2D. This time, we need to find a material that'll make some cool ripples and waves for us. I went into the generic browser and chose T_EFX_Energy_Tile_01 from the same place I got the other texture from and called it RippleEffect. Now connected the panner to the UVs square on the texture parameter, and turn on the real time preview. How cool is that?

Next we're going to create a BumpOffest to the right of our second texture sample, and to the right of that we want make a copy of your texture sample.
To make a copy of the texture sample, simply select it, and press Ctrl+C (copy), then Ctrl+V (paste). You can then drag it into position by clicking on it and holding down shift. If you're material designer window is getting disorganised, now might be a good time to reorganise it!
We're going to connect things a little differently. We're going to now connect the red channel (the red square) of RippleEffect to the height square of our BumpOffset (we're going to use the red value of our sample to modify our second texture sample), then connect the black square on the right of the bump offset to the UVs of your copied BaseTexture.
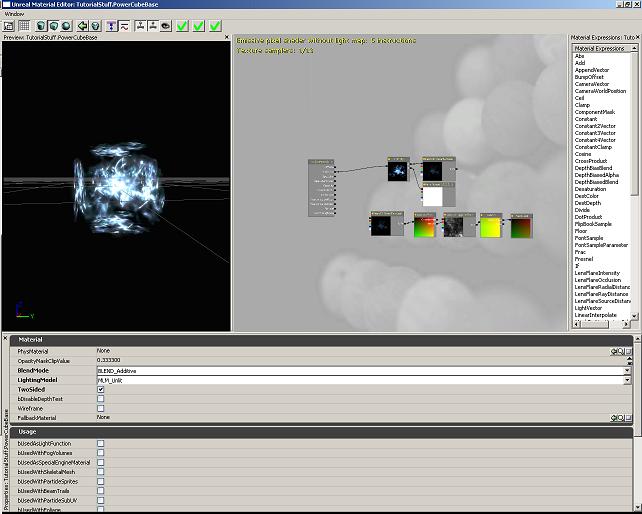
Now we're going to make sure these ripples take effect. Underneath the copy of BaseTexture, create a new constant. I gave it the value 4. Next to that, create a new multiply. Yep, you guessed it, we're going to multiply the copy of BaseTexture by the constant. In fact, we're only going to multiply the red channel, so connect the red square of the BaseTexture copy to the top square of the multiply expression, and connect the constant to the bottom.
Now we're going to want to see what this will really look like. Connect the left hand side of the multiply expression to the Opacity square of PreviewMaterial_0.
Now that, looks impressive. Step back and marvel your creation for a few seconds, and think about the steps it took to get there.
This is all fine and dandy, but now we need to work out how to make it change colour and material...
Material Parameters
The single most powerful tool in the material creation arsenal is the parameter. If you've played with materials before, you'll wonder why we've been using them instead of more simple things - for example, why use a TextureSampleParameter2D when we can just use a normal TextureSample?
The answer lies in what makes Parameters special. Parameters can be given names - the reason for this is because we can change parameters without having to go into the editor and change a material manually - we can create instances of the material, and we can change parameters in the code itself. This makes it a very powerful thing indeed, and in fact, it is exactly what we need to let us change the colour and appearance of the Power Cube.
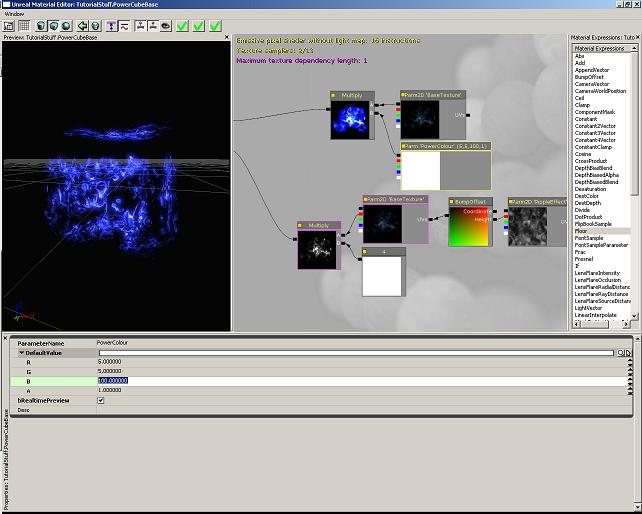
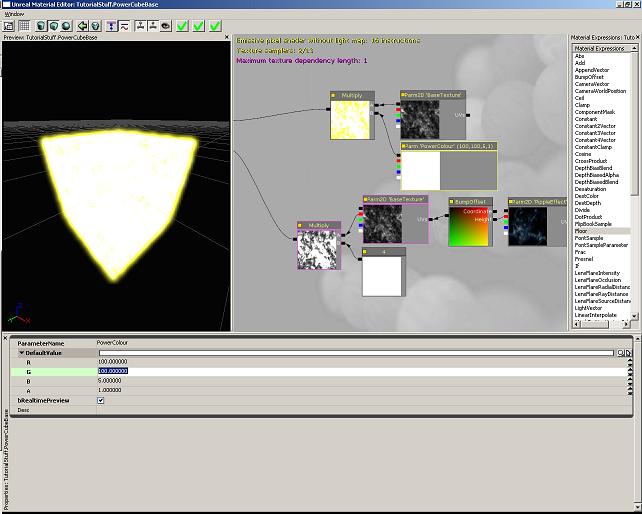
To change the colour of the cube, we already have a vector parameter. Let's go back and find it and give it a name, I called it PowerColour. We can make the material different colours by changing the values here. By having a high R (red) value, we get a red material, or a high B (blue) value gives us a blue material. If we have a high R and G (green) value, we get a yellow material. Play with it and find out how changing the values changes the colour.
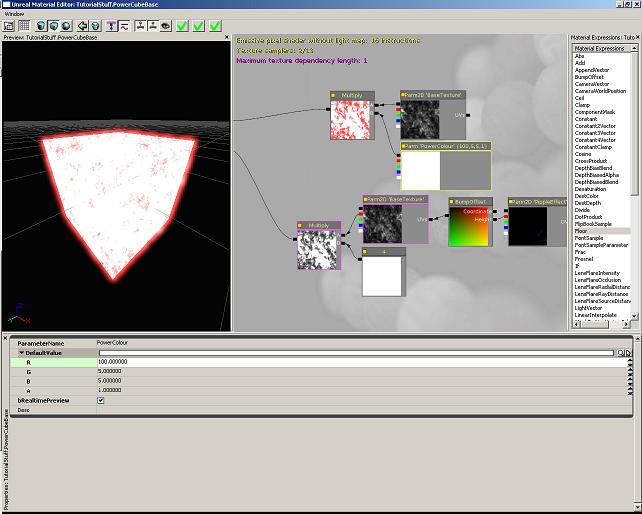
I finally settled on a neutral colour of yellow (R = 100, G = 100, B = 5), a red colour (R = 100, G = 5, B = 5) and a blue colour (R = 5, G = 5, B = 100), then set all the defaults back to what they were before. Write these down, because when we come to make the Charge Rifle, we're going to use code to change those parameters from within the game.
We can also change some textures to make our heavy and our bouncy Power Cube. We could find new textures in the generic browser, but me, being the master of all cunning, decided that the best route would be to simply swap both my BaseTextures and my RippleEffect around.
Now I have a very solid looking cube with very little movement, or a very soft looking cube with a lot of movement, and I can change the colour whenever I please!
You may want to write down what materials are used by which, so that they're easy to recall when you come to write some code.
And that's it for now. Why not tinker with what you have learnt, or look at all of the other material in UnrealEd - some of them are far, far more impressive than what we created today. Don't forget to check back soon to see what's coming next and find out how to manipulate your materials!


Woot! Keep 'em coming! Much thanks!
You're welcome =]
I do want to post part two - but I'm unable to until the blasted text editor is fixed.
Doh.
That was sort of confusing and difficult to follow at times. I did successfully finish it though. Once I connected the multiply to the constant 4 at the end then tagged that into the opacity field i had an error in the top left that read "Maximum texture dependancy length 1", normal? Good tutorial tho, thanks.
Yes, it's perfectly normal - in fact you can see it in the example screenshots. What parts did you find difficult / confusing? Telling me will help me improve it for future users when I find the time.
Also, I added a panner to the top texture too and made the speed 2 for x and y to create an even crazier electric effect. It looks a little better than the static electric effect
The best way to learn how to construct materials, is just to play with them. This one was a real basic tutorial to help people dive into the material editor and get started. I'm thinking of doing a few very complex materials later, but we'll see how things go.
Hi, to begin i must say thank you for this tutorial, he's very good. I am having a problem in the part that you say to put :"obj savepackage file=NodeBuddiesCopy package=NodeBuddies" (without the quotes) in the log tab; and when i do that it gives this error:
Cmd: obj savepackage file=NodeBuddiesCopy package=NodeBuddies
Warning: Error opening file 'Save.tmp' (C:\Program Files\Unreal Tournament 3\Binaries\).
Sorry for the long post. Help me please. Thanks
This is a great guide, but I also had trouble following it. I think some lefts were rights and vice-versa when connecting the black boxes. Having higher resolution images would have helped. Also, I used CTRL to drag the boxes as SHIFT didn't work.
Thanks so much for this!! I have been killing myself trying to figure out how to do this. There should be an easier way to just change the UTEditor.ini file but this works for now.
Great tutorials. Thanks!
One thing I'd like to point out is that when you refer to the boxes in the Material Editor, it is very confusing when you say for example "the black square on the right of the bump offset". This is because the black square you are referring to is on the left of the bump offset. I think you're calling it the right because your frame of reference is from the object... as in if it were facing us, the black box would be indeed on its right side. This is confusing as it makes more sense to just use your readers' frame of reference and just say "the black box on the upper left of the bump offset".
Im having some issues getting the Material from Envy_Effects to load. My beleif was just highlight it in the generic browser and then click the little green arrow. However this doesnt seem to work. HELP! thanks.