Location
AddonsFilename
Volvo_facelift.rarCategory
Vehicle SkinLicence
Public DomainUploader
V.K.Added
Size
1.84mb (1,931,667 bytes)Downloads
6 (1 today)MD5 Hash
14706c12149d9d6fa9713d5b65b8c8f0Embed Button
Embed Widget
Description
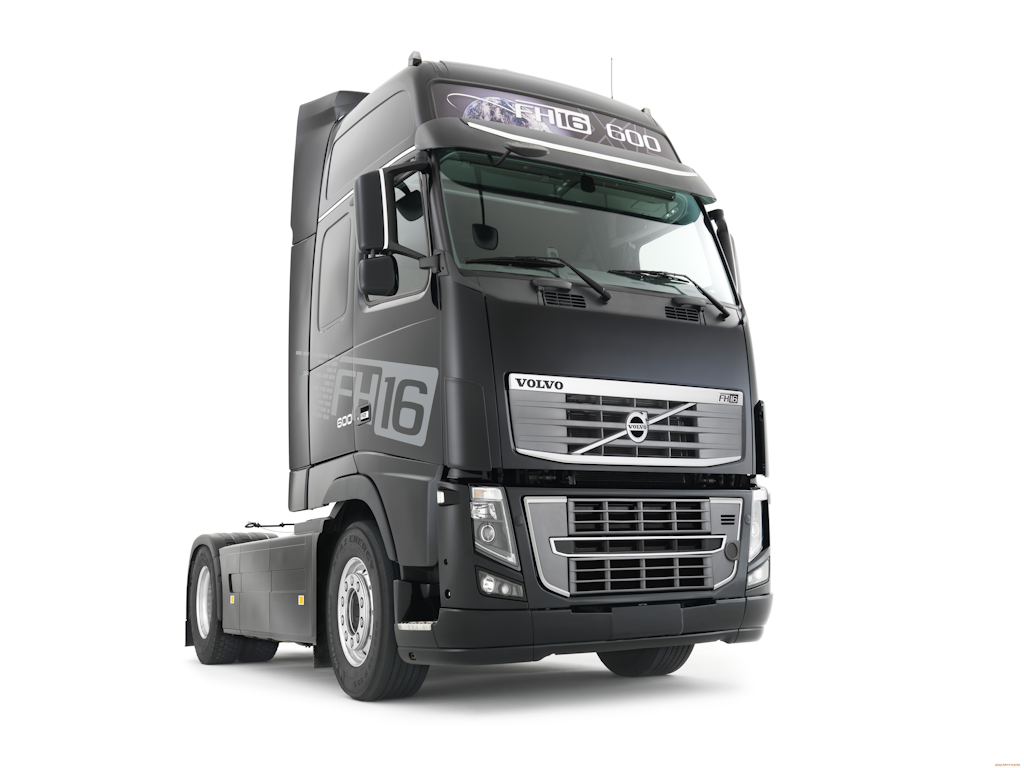
Текстуры для Volvo FH/Textures for Volvo FH.

🇷🇺 : Текстуры для Volvo, заменяющие старую решетку из 90-х годов на новую из 00-х. Помимо текстур, была переделана модель бампера и горящих фар для большей эстетичности.
Установка:
Перед установкой мода рекомендуется сделать бэкап файлов игры!
Часть 1. Установка текстур. Для установки вам понадобится RigNRoll RES Editor или D2Archiver. Текстуры находятся в папке «Textures».
Части 2 и 3 предназначены для тех, кто хочет установить этот мод самостоятельно или совместить с другим (например, SEMod), все файлы для этого находятся в папке «Files for manual installation». Для тех, кто не хочет с этим заморачиваться, в папке «Files for automatic installation» уже есть готовые файлы TRUCKS.B3D (скинуть туда, где находиться TRUCKS.RES) и vehicle.tech (скинуть туда, где находиться King.exe), но они для версии 8.0 и выше.
Часть 2. Замена модели бампера и горящих фар. Для замены вам понадобится программа B3D Block Editor.
- Откройте программу, нажмите «Файл», затем «Открыть основной файл», выберите «TRUCKS.B3D». В левом окне должны появиться блоки «Materials:» и «Blocks:».
- Нажмите «Файл», затем «Открыть дополнительный» и выберите «volvo_bumper.b3d». В правом окне должны появиться блоки «Materials:» и «Blocks:».
- В левом окне откройте «Blocks:» (нажмите на +), затем ищите блок «LNKTRK251_0» (можно воспользоваться поиском, для этого нажмите «Правка», затем «Найти»), откройте его, выберите «refer_Damage1Key» (нажмите на квадрат). В правом окне выберите «refer_Damage1Key», нажмите "Правка", затем "Заменить контейнер", появится окно, нажмите «ОК».
- Повторяем шаг 3, но вместо «LNKTRK251_0» ищем «LNKRGD57_0».
- Нажмите «Файл», затем «Открыть дополнительный» выберите «volvo_bumper.b3d».
- В левом окне открываем «Blocks:», далее ищем блок «$$$Group_1393_truck», выбираем его, в правом окне также выбираем «$$$Group_1393_truck», нажимаем «Правка», затем «Заменить контейнер», появится окно, нажмите «ОК».
- Повторяем шаг 6, но вместо «$$$Group_1393_truck» ищем и выбираем «$$$Group_216_rigid».
- После выполнения всех вышеперечисленных шагов нажмите «Файл», затем «Сохранить», выберите «TRUCKS.B3D».
Часть 3. Изменения координат свечения фар. Для изменения вам понадобится программа D2TechEditor.
- Откройте программу, нажмите «Файл», затем «Открыть», выберите «vehicle.tech».
- Выберите «Volvo» из выпадающего списка.
- Ищем параметры «Fara_FL» и «Fara_FR». В «Fara_FL» прописываем следующие значения «-0.985000 3.184400 -0.190000». В «Fara_FR» прописываем следующие значения: «0.985000 3.184400 -0.190000».
- Повторяем шаг 2 и 3, но вместо «Volvo» выбираем «VolvoR».
- После выполнения всех вышеперечисленных шагов нажмите «Файл», затем «Сохранить».
🇬🇧 :Textures for Volvo, replacing the old grille from the 90s with a new one from the 00s. In addition to the textures, the model of the bumper and the burning headlights was redone for greater aesthetics.
How to install this mod:
Before installing the mod, it is recommended to backup your game files!
Part 1. Installing textures. To install you will need RigNRoll RES Editor or D2Archiver. The textures are located in the "Textures" folder.
Parts 2 and 3 are intended for those who want to install this mod on their own or combine it with another (for example, SEMod), all files for this are located in the «Files for manual installation» folder. For those who don’t want to bother with this, in the «Files for automatic installation» folder there are already ready-made files TRUCKS.B3D (drop to where TRUCKS.RES is located) and vehicle.tech (drop to where King.exe is located), but they are for KotR.
Part 2. Replacing the bumper model and burning headlights. To replace it, you will need the B3D Block Editor program. The program only has Russian language!
- Open the program, click «Файл», then «Открыть основной файл», select «TRUCKS.B3D». The «Materials:» and «Blocks:» blocks should appear in the left window.
- Click «Файл», then «Открыть дополнительный» and select «volvo_bumper.b3d». The «Materials:» and «Blocks:» blocks should appear in the right window.
- In the left window, open «Blocks:» (click on +), then look for the block «LNKTRK251_0» (you can use the search, to do this, click «Правка», then «Найти»), open it, select «refer_Damage1Key» (click on square). In the right window, select «refer_Damage1Key», click «Правка», then «Заменить контейнер», a window will appear, click «OK».
- Repeat step 3, but instead of «LNKTRK251_0» we look for «LNKRGD57_0».
- Click «Файл» then «Открыть дополнительный» select «volvo_bumper.b3d».
- In the left window, open «Blocks:», then look for the block «$$$Group_1393_truck», select it, in the right window we also select «$$$Group_1393_truck», click «Правка», then «Заменить контейнер», a window will appear, click «OK» .
- Repeat step 6, but instead of «$$$Group_1393_truck» we look for and select «$$$Group_216_rigid».
- After completing all the above steps, click «Файл», then «Сохранить», select «TRUCKS.B3D».
Part 3. Changes in the coordinates of the headlights. To change you will need the D2TechEditor program. The program only has Russian language!
- Open the program, click «Файл», then «Открыть», select «vehicle.tech».
- Select «Volvo» from the drop-down list.
- We are looking for the parameters «Fara_FL» and «Fara_FR». In «Fara_FL» we enter the following values «-0.985000 3.184400 -0.190000». In «Fara_FR» we enter the following values: «0.985000 3.184400 -0.190000».
- Repeat steps 2 and 3, but instead of «Volvo» select «VolvoR».
- After completing all the above steps, click on «Файл» then «Сохранить».

Preview
Post a comment
RTX Remix
RTX Remix is a modding platform by NVIDIA, which allows modders to create stunning HD remasters of classic games (see all supported), with ray tracing and DLSS.
This vehicle skin is NOT RTX Remix compatible. Learn more about ModDB's collaboration with the Remix community to organize all compatible games,. Hide this dialog.
Community Rating
Average
-0 votes submitted.
Related Games

Related Engines
Hard Truck Series Engine
Commercial
Related Groups
SoftLab-NSK
Developer

ValuSoft
Developer & Publisher
Tags